This is the Aladin FAQ, written by P. Fernique, T. Boch, D. Durand & S. Derriere, which corresponds to Aladin Desktop v12.
General questions about Aladin
What is Aladin?
Aladin is an interactive software sky atlas allowing the user to visualize digitized astronomical images, superimpose entries from astronomical catalogues or databases, and interactively access related data and information from the Simbad database, the VizieR service and other archives for all known sources in the field.
Created in 1999, Aladin has become a widely-used VO tool capable of addressing challenges such as locating data of interest, accessing and exploring distributed datasets, visualizing multi-wavelength data. Compliance with existing or emerging VO standards, interconnection with other visualization or analysis tools, ability to easily compare heterogeneous data are key topics allowing Aladin to be a powerful data exploration and integration tool as well as a science enabler.
Aladin is declined in 2 tools (see more details):
-
Aladin "Desktop" is the regular client. It provides all functions and it runs as a classical software (requiring an installation).
-
Aladin "Lite" is dedicated to HiPS visualization. It runs on Web pages, requires JavaScript, and relies on WebGL (since v3) and HTML5 canvas technology. It is available since 2013.
This FAQ is dedicated to Aladin "Desktop" client. Documentation concerning Aladin Lite is available online.
Aladin is developed and maintained by the <&CDS.home|"Centre de Données astronomiques de Strasbourg (CDS)">.
-
Pierre Fernique [CDS]: Aladin Java base code & documentations
-
Thomas Boch [CDS]: Aladin Lite developer, and a lot of advanced Aladin features
-
Anaı̈s Oberto [CDS]: RGB support, progressive sky mode
-
François Bonnarel [CDS]: Image data base, Image calibration
-
Chaitra [CDS]: TAP and Datalink integration
Contributors:
-
François-Xavier Pineau [CDS]: HEALPix library
-
François Ochsenbein [CDS]: Coordinate manipulation
-
André Schaaff [CDS]: SAVOT library
-
Caroline Bot & Mark Allen [CDS] & Daniel Durand [CADC] & Daniel Egret: Tests and Documentation
-
Thomas Keller & Christophe Saillard [Observatoire astronomique de Strasbourg]: Hardware management
Other contributions:
- M. Taylor [Bristol University] :
JSAMP and
auth.jarlibraries - M. Reinecke [MPA]: MOC rangeSet library
- P. Harrison:
JSOFAlibraries - Hayalim Uzay Team: Turkish translation
- M. Ohishi: Japanese translation
- Spanish VO: Spanish translation
- F. Freistetter: German translation
- G. Iafrate: Italian translation
- N. Samus: Russian translation
- A. Sedaghatkish: Persian translation
- Chi-Yung Yan: Traditional chinese translation
- C. Cui: Simplified chinese translation
- T. Donalson [STScI]: HST FoV
- P. Grosbol [ESO]: IQE original C code
- R. Savalle & Chi-Hung Yan [CFH]: CFHT FoVs
- T. McGlynn [HEASARC]: Colormap adjustment original Java code
- T. West: BMP writter original Java code
- R. White & P. Dowler [CADC]: Hdecomp original C code and Java code
Copyright:
- © Université de Strasbourg/CNRS 1999-2024 - distributed under GPL V3
- Portions of the code (Planetary support) have been developed in the framework of VESPA/Europlanet european project (2017-2023).
- Portions of the code (HiPS & MOC) have been developed in the framework of ASTERICS european project (2015-2019).
- Portions of the code (progressive catalogs, PM facility) have been developed in the framework of GAIA CU9 (2012-2022).
- Portions of the code (outreach mode) have been developed in the framework of EuroVO AIDA & ICE projects (2008-2012).
- Portions of the code (WCS in JPEG, IDL integration, FoV advanced integration, Fits cubes, Xmatcher by ellipses, SAMP integration) have been developed in the framework of EuroVO VOTech project (2005-2008).
- Portions of the code (contours, filters, dataTree, crossmatch, column calculator) have been developed in the framework of the Astrophysical Virtual Observatory (AVO), an EC RTD project 2002-2004
- The RGB feature has been developed in the framework of the IDHA project (ACI GRID of the French Ministère de la Recherche).
Who is using Aladin Desktop?
Aladin is used by professional astronomers for doing their science. Here the Aladin citation history from ADS.
In addition to professional astronomers and amateurs, Aladin is also incorporated in many astronomical projects and courses. We provide below some examples (non-exhaustive list):
Softwares:
-
LBTO RTD - Aladin Adaptation for real time display support of the Large Binocular Telescope LUCI software - 2016-
-
HSC Queue Mode - Aladin FoV check for HSC - 2017-
-
SOFIA - Aladin extension for SOFIA - NASA - 2017
-
APT - The Hubble Space Telescope & James Webb Space Telescope Proposal Tool - STScI/NASA - 2006-, 2016-
-
The Unified GuideCam Tool - The ESO/VLT proposal tool - 2015
-
SCISOFT - Scisoft - An Astronomical Software Collection - ESO - 2007
-
eXcalibrator - 2011
Courses & astronomical tutorials:
-
IASC courses - 2019-
-
Wikiversity - 2015
-
Rutgers University - 2014
-
FoV and Guide Star Selection Using the Aladin Sky Atlas - YouTube - 2012
-
Create A Color Image with Aladin Sky Atlas - YouTube - 2010
Repackaging:
Which astronomical data are available via Aladin?
Aladin enables worldwide access to astronomical services providing Aladin compatible data (images, cubes, catalogues, ...). More than 35,000 data collections are available in a few clicks, from biggest data centers such as NASA, ESA, ESO, MAST, CADC, JAXA, CDS (Simbad, VizieR), NED, SkyView, IRAS, GAVO, ... to smaller institutes or project portals such as PanSTARRs, LEDAS, SUPERCosmos, SkyBOT, SLOAN, ...
Since Aladin v10, this data collection list is presented as a "data tree" (left panel) that you can easily browse, filter, explore...
In addition, you can use your own data images (in FITS, JPEG, GIF, PNG),
catalogues (FITS, VOTable, Tab-Separated-Value (TSV),
Character-Separated-Value (CSV), IPAC-TBL or simple ASCII tables
(aligned columns)), or all sky maps (HiPS and HEALPix FITS maps) via the
menu File -> Load local file or on the command line as one argument
or also via the script command load.
Aladin Desktop, Aladin Lite? Which difference?
The Aladin Sky Atlas project is declined in 2 tools:
-
Aladin "Desktop" is a widely-used Java tool capable of addressing challenges such as locating data of interest, accessing and exploring distributed datasets, visualizing multi-wavelength data. Compliance with existing or emerging VO standards, interconnection with other visualization or analysis tools, ability to easily compare heterogeneous data are key topics allowing Aladin to be a powerful data exploration and integration tool as well as a science enabler. Aladin Desktop is based on Java technology. It requires a classical installation on the user machine.
-
Aladin "Lite" is a lightweight version of the Aladin Sky Atlas, running in the browser and geared towards simple visualization of a sky region. It allows one to display progressive surveys (HiPS) and superimpose tabular (VOTable) and footprints (STC-S) data. Aladin lite requires JavaScript, and relies on WebGL (since v3) and HTML5 canvas technology, currently supported by any modern browser. Aladin Lite is easily embeddable on any web page and can also be controlled through a JavaScript API. Documentation concerning Aladin Lite is available at this address: https://aladin.cds.unistra.fr/AladinLite/doc
Beta releases, which differences with official Aladin version?
The official Aladin Desktop version is the latest stable release of the software.
Aladin Beta versions are continuously released, and are identified by a running
decimal version number, for example v12.119.
The Aladin Beta version incorporates new features in test phase for the next official Aladin version. The stability of these features is not totally guaranteed.
This beta version can be downloaded from the Aladin download page .
The Aladin Beta version can then be started with a command line (possibly increasing the memory ) :
java -jar AladinBeta.jar
Is it true that Aladin is now supporting planetary data?
Yes, that's right.
Aladin v12 offers access to planetary data provided by the Virtual
Observatory: planetary surface, coverage (MOC), EPN-TAP catalogues, ...
These planetary data are collected in the Solar System branch of the
Aladin resource tree.
As the interoperability protocols related to planets are not yet fully defined and implemented by the data providers, some planetary data cannot be dissociated from celestial data, and vice versa. This can lead to inappropriate superimpositions (e.g. Martian craters on the celestial sphere). Therefore, to enable access to planetary data, the user must explicitly request it, either through the user preferences (menu
Edit -> User preferences...), or through the-planetparameter on the command line.
Getting and running Aladin
Are Aladin program and documentation only in English?
This is not true!
Aladin program has multi-language support. Presently, it supports French, English, German, Italian, Traditional and Simplified Chinese, Russian, Persian, Spanish, Japanese, Portuguese, Turkish languages. It can be easily extended to other languages by following these instructions:
-
Launch Aladin and open the preference panel (menu
Edit -> User preferences...); -
Check your language, and if it is not in the list, press the
New Translation?button; -
Follow the instructions.
By default, if it supports it, Aladin starts in the Operating System
language, otherwise it starts in English. You can force this choice via
the menu Edit -> User preferences....
Call for translators: We would be very pleased to support other languages.
Do not hesitate to contact us if you would like to add your own, or if you have done the translation for your own needs and you agree to integrate your translation in the official version, or if you want more details.
The full Aladin manual is available in French and in English language.
I do not want to read the manual!
As a lot of users, you do not like to read a big manual. For basic functions, you can easily explore the Aladin interface and menu and play with it without requiring to read the manual before. Just launch Aladin, and enjoy the sky.
Now, if you need help, a new function has been incorporated since Aladin v10 for "lazy" users. Just let your mouse on a button or an icon. After 6 seconds, you will get a short help on this function, more detailed than the basic tooltip.
How to install and start Aladin Desktop?
Aladin Desktop can be downloaded from this page .
If your configuration is supporting it, you can also install and start Aladin Desktop thanks to JNLP technology (IcedTea under Linux). Just click on this JNLP URL (Java Webstart installer).
Note that you need to have a Java runtime environment installed on you machine - http://www.java.com/download - see Java Virtual Machine.
You can also start Aladin Desktop by downloading the Aladin.jar file and use this command line in a console window:
java -jar Aladin.jar
What is a Java Virtual Machine?
Any Java executable (like Aladin) consists of binary code generated by a Java compiler. This binary code is (in theory), independent from any hardware configurations and operating systems. To be executed, it needs a Java Virtual Machine (JVM), which is a special programme analyzing the binary code and executing the instructions for a given architecture.
This Java Virtual Machine needs to be downloaded for your particular platform - see http://www.java.com/download .
Can I still use Aladin in applet mode?
No, you can not. Since v10, Aladin is no longer supporting applet. These days, the Java applet technology is becoming more and more deprecated and HTML5 based developments such as Aladin Lite should be preferred.
If you need Aladin in your Web browser, have a look at Aladin Lite which provides definitively a better solution (see https://aladin.cds.unistra.fr/AladinLite/doc).
Which machines support Aladin?
Aladin is compatible with Java releases 1.8 or higher. It means that Aladin is supported by the majority of the existing desktop machines - PC under Linux or Windows, Macintosh under OSX,...
When developing Aladin, we are usually trying hard to optimize its performances. So even a "small" computer is a good choice to run Aladin. However, to deal with large catalogs (>1,000,000 sources), you need enough memory (typically 2Gbyte RAM).
Note that Aladin Desktop can run neither under Android phones/pads nor Mac mobile phones. Mac phones do not integrate Java technology. And even if Android system is Java based, Google has not implemented legacy Java Oracle libraries required by Aladin (notably AWT). Therefore, no mobile support for Aladin Desktop is provided.
If you need Aladin on your mobile phone, have a look at Aladin Lite (see https://aladin.cds.unistra.fr/AladinLite).
Can I use OpenJDK, or is Java Oracle better?
For a few years now, there is no difference between the OpenJDK distribution and Oracle, only the licenses differ, with no impact on the use that is made with Aladin. Note that there are other java distributions, generally identical internally, but offered by other IT providers such as Corretto by Amazon. The only constraint is to choose a version higher or equal to JVM 1.8.
How accurate are Aladin's coordinates?
All Aladin's coordinates are given to the best astrometric accuracy decoded from images header.
However, in some cases, positions could be off by many arc seconds and can't be used as precise astrometric positions (depending on the image WCS header).
The accuracy of the positions of one given image can easily be checked by superimposing reference astrometric catalogues such as the Tycho-2 Catalogue or the Gaia catalogue. Although even those astrometric catalogues do carry astrometric errors. We advise any potential user who requires precise astrometry to read the documentation of these catalogues to understand their limits.
What is maximum image size which Aladin could handle?
Aladin has no RAM limit for images loading in FITS format. If the image
is too large for your memory, Aladin will create a preview on the fly
and will load the missing pixels when you zoom in on a position. Notice
that the uncompressor (rice or gzip) can require a lot of memory. In
this case, it is preferable to uncompress your huge image with
an independent tool before loading it in Aladin.
If you are using large JPEG or PNG images, you need to reserve at least 6x the image size as RAM (ex: a 20000x20000 pixel JPEG requires 2.2Gbyte). See also the FAQ question for increasing memory.
Notice that you have also the possibility to create and use a HiPS from your huge image, or collection of huge images (see this section).
What is maximum catalog size Aladin can handle?
Aladin spends about 500 bytes per catalog object in memory. It means that you can load about 2 million objects catalog provided you have 1 Gbyte RAM available. But in practice, it is difficult to work with more than 1 million objects due to the redrawing time.
See also the FAQ question for increasing memory.
Can I increase the Java memory?
Yes you can!
The Java command line parameter -Xmx allows you to increase the
maximum memory size used by your Java runtime environment.
For example: java -Xmx2g -jar Aladin.jar : allocates 2Gbyte memory.
But, if you have used a dedicated Aladin packaging you will have to adapt the Aladin launcher according to your configuration:
- Linux installation:
- If you are under Linux and you use the
Aladin launcher, you can modify this default maximum memory
configuration by editing directly the script launcher
Aladinand set thememvariable to the proper value. - Windows installation:
- If you are under Windows and you use the
Aladin.exeexecutable, you cannot modify the default maximum memory configuration (1Gbyte). In this case, you will have to launch Aladin via a console, or a batch file, with the command line described above. - Mac installation:
- If you are under Mac and you used the
Aladin.dmginstaller, you can modify this default maximum memory configuration by editing directlyInfo.plistin the directory/Applications/Aladin.app/Contentsand modify the following line:<string>-Xms128m -Xmx2g</string>.
Usage
How can I find and load data from astronomical servers?
Since v10, Aladin provides a global method to load images, cubes, catalogs, based on the "Data Discovery Tree". In the new left panel, Aladin displays as a tree all the data collections that you can load (more than 35,000 collections). This tree aggregates all collections provided by data centers, institutes, and other projects compatible with Virtual Observatory technology, notably CDS collections (Simbad and VizieR catalogs) and HiPS surveys. Explore this tree by opening branches, and click on a collection name to get the "Access selector" window associated to this collection. This small form shows all available methods to access this collection (by cone, by criteria, by region,...) and possible derived products (coverage map, density map,...).

Example Access selector window for the DSS2 blue image survey
Additionally, Aladin provides a powerful filtering mechanism to temporarily hide non relevant collections (by keywords or other coverage constraints). Since v11, Aladin adds advanced sort facility for the data discovery tree.
Note that the "Server Selector" form used in earlier Aladin
versions is still available (menu File -> Open server selector...,
or Ctrl+L).
I do not retrieve my surveys in the File menu?
You are right! Since the release v10, all data collections are now
available via the Data Discovery Tree (left panel), and no longer via the
File menus.
There are a lot of collections in the Data Discovery Tree!
Yes, of course, and that is the advantage of Aladin! And the filter
function will be your friend to manage the collection avalanche
(select field under the tree panel). Do not hesitate to type
keywords, ID, or any other constraints that you need to filter this long
list of collections. Another help will be the sort function that you can
apply on the "Data Discovery tree" (sort icon
![]() at the bottom of the
tree, or in the "Access selector" window associated to some nodes of the tree).
at the bottom of the
tree, or in the "Access selector" window associated to some nodes of the tree).
In addition, do not hesitate to explore the advanced filtering mechanisms
(menu File -> Filter on data collections...). You will discover that
you can filter this list by a lot of advanced constraints (spatial, temporal,
energy). Note that these advanced filters can be saved to be reused
later. They appear in the filter selector just under the select
field.
Eventually, you could create a bookmark for a specific collection in
order to avoid to search it each time you need it (bookmark icon
![]() in the
"Access selector" window associated to each collection).
in the
"Access selector" window associated to each collection).
In the Data Discovery Tree, some branches appear in green others in orange. Why?
In the data tree provided by Aladin (v10 and following) for accessing any data collection, the leaves written in green color will have results inside the current view. On the contrary, the leaves in orange will have no data in the current view. If the collection does not provide its coverage (MOC), Aladin will display it in white color (no coverage knowledge).
I do not understand what the "scan" function does?
Under the Data Discovery Tree, you have a scan icon
![]() . It can be
activated for collections which do not provide their spatial coverage
(MOC) in the VO registry. In this case Aladin is not able to know in
advance if there will be results in the current field or not.
. It can be
activated for collections which do not provide their spatial coverage
(MOC) in the VO registry. In this case Aladin is not able to know in
advance if there will be results in the current field or not.
To solve this issue, you can "scan" these collections (those you have selected in the tree). Aladin will explore these collections in order to produce a "temporary" and "local" -in the displayed field- coverage map for each of them. After this process, Aladin will be able to indicate if these collections will have results (green color) or not (orange results) in the field.
Take care that this
scanprocess can be long and quite heavy for the collection servers. So try to convince the data providers to generate their MOC and register them in the VO registry. It's definitively a better solution.
How to use TAP in Aladin?
TAP is an acronym for "Table Access Protocol". It is a very powerful mechanism for querying remote databases handling table data. Any type of constraint can be submitted and the resulting fields can be defined explicitly. TAP also incorporates an asynchronous request mechanism for large requests. TAP uses a dedicated query language called ADQL which is an astronomical extension of the well known DB query language SQL. TAP and ADQL have been standardized by IVOA and the documentation can be found on these addresses:
You have two methods to use TAP in Aladin: on resource or on server:
- TAP on resource:
- Aladin provides a dedicated TAP form for each resource compatible with
this protocol. This form is accessible via the check box
by criteriadisplayed in the "Access selector" window associated with each resource in the Data Discovery Tree. In this case, the TAP form is pre-filled with the metadata corresponding to the resource. You can write an ADQL query directly in the bottom panel, or more easily you can generate it by specifying with the mouse the fields you want to obtain and by adding the constraints one by one. These actions will be automatically translated into the corresponding ADQL syntax. In addition, thanks to theSYNC/ASYNCselector, before submitting your request, you can specify whether you want to launch the request in a-synchronous mode - and later retrieve the result even in another Aladin session. - TAP on server:
- In some cases, the TAP request that you want to submit is not limited to
a unique table, an unique resource. In this case, it is more suitable to
open the TAP form for all the DB tables available on a dedicated TAP
server. You can switch from single-resource mode to global mode using
the
Modeselector located at the top right of the form. You can also directly use the menuFile -> Open server selector... -> TAPand select the TAP server that you want to query.
It is possible since release v11 to take into account a local table, already loaded in Aladin as a catalog plane to perform a
joinwith remote data accessible by TAP. This extremely powerful mechanism is available via theJoinbutton present in the TAP form.
How do I update a "cone search" catalogue plane?
Until Aladin v11, it was not yet possible to update the contents of a catalogue plane containing the objects of a positional query (generally by cone). The solution consisted in re-interrogating the same server with the new query cone, even if it meant creating a second plane in the stack.
Aladin v12 adds this functionality (menu Catalog -> Update all "Cone Search" planes,
or Alt+U), for planes
resulting from a Cone Search, but also for those constructed from the
TAP query with a positional constraint. A redo shortcut icon
![]() performing
the same action is also available in the icon bar under the view panel.
performing
the same action is also available in the icon bar under the view panel.
Thanks to L. Michel for this feature idea.
Can I load my own image or table files?
Yes, you can !
The simplest way is to select the menu File -> Load local file... (or Ctrl+O).
The dedicated format for the images is FITS with or without WCS
fields in the
header. These images can be compressed with RICE, gzip (internally or
externally) or Hcompress.
The Multiple FITS extension
format is fully supported.
You can also load JPEG, PNG or GIF images. Generally these will be
loaded without astrometric solution, so you will have to add one
manually (via the menu Image -> astrometric calibration...) if you
want to overlay sources from astronomical catalogues - see the question
on astrometrically calibrated JPEG or PNG image.
Also, Aladin supports partially PDS images (Planetary Data System), but with these restrictions: no compression and the header must be inside the image.
The available formats for the tables are:
-
XML (VOTable or Astrores - see the question on VOTable).
-
FITS ASCII table.
-
FITS binary table.
-
Character-Separated-Value (TAB, pipe, semicolon, coma, ...)
-
CSV a la Excel/LibreOffice (column values quoted by
") -
Simple ASCII tables (rows aligned with spaces (-> no space allowed in values)
-
S-extractor output (see S-extractor documentation)
-
IPAC TBL table format.
CSV examples:
One record per line, EACH FIELD, quoted or not, SEPARATED by ONE TAB or ONE SEMICOLON. Heading line can be present. If there are several heading lines, the header and the data have to separated by a dash line as shown below. If there is no header at all, the first column has to be RA, the second column DE.
By default, the coordinates are assumed in ICRS, either in decimal
degrees or in sexagesimal notation (with whitespace ' ' or ':' separator). Aladin
can also support ECL, GAL and SGAL coordinate frames based on
non-ambiguous column names.
In the header, empty fields are not allowed and must be quoted (ex:
"").
Example 1:
05 34 53.16     +22 03 20.0     [SPB96] 910  UV
05 34 21.95     +22 05 52.0     [SPB96] 885  UV
05 34 14.85     +22 05 25.4     G 100-20     PM*
05 33 51.13     +21 56 28.0     [SPB96] 858  UV
05 34 47.04     +21 51 51.0     [SPB96] 906  UV
Example 2:
ID  RAJ2000 DEJ2000 GSC number  Pmag
?   deg deg ?   mag
--  ------- ------- ----------  -----
01  185.701 15.822  0144501972  15.55
02  185.766 15.795  0144502507  13.92
03  185.704 15.844  0144501918  15.06
04  185.710 15.849  0144502383  14.78
Example 3:
ID;RAJ2000;DEJ2000;GSC number;Pmag
"";deg;deg;"";mag
--;-------;-------;----------;-----
1;185.701;15.822;144501972;15.55
2;185.766;15.795;144502507;13.92
3;185.704;15.844;144501918;15.06
4;185.710;15.849;144502383;14.78
You have four possibilities to load your own data:
-
by command line argument: specify the filename containing your catalogue as command line arguments when you launch Aladin (ex:
java -jar Aladin image.fits mytable). -
by script command: use the
loadscript command in the Aladin console (ex:load myvotable.xml). -
by the "File form" of the graphical interface: select your file with the file selection widget. If you select a "directory level" instead of a filename in the text field, Aladin will create a "data tree" of Aladin compatible files found in this directory (see how to add your local files to the "data tree").
-
from another VO compatible application via SAMP messages - see the corresponding FAQ entry.
Aladin recognizes automatically the types of files. Filename extension doesn't matter. However for Aladin script files, it is recommended to use
.ajsextension to avoid some ambiguities.
Is Aladin supporting IPAC TBL format?
Yes, it is, since v7.5!
Is Aladin supporting MS-Excel or Libreoffice CSV?
Yes, it is, since v7.5! The possible quoting values are correctly interpreted.
Is Aladin supporting JPEG, PNG or GIF image format?
Yes, it is!
Aladin is supporting JPEG, PNG and GIF images. Generally these images
will be loaded without astrometric solution. You will have to add one
manually via the menu Image -> astrometric calibration....
For JPEG and PNG formats, Aladin is able to recognize a FITS header
stored into a "comment segment". It means that you can easily attach a
WCS astrometric solution to your JPEG or PNG image with a simple image
tool such as GIMP. The supported syntax can be either FITS header dump
or ASCII lines not necessarily aligned on 80 characters. Alternatively,
the FITS header can be stored in an associated file with the same file
name and the extension .hhh. This file can be a classical 80
character FITS header, or a basic ASCII file.
Aladin also recognizes AVM (Astronomy Vizualization Metadata) tags inside a JPEG or PNG image for finding the astrometric solution. Note that Aladin saves JPEG and PNG images with the WCS astrometric solution in FITS keyword syntax, not via AVM.
Is Aladin supporting PDS image format?
Yes, but partially! Aladin can display Planetary Data System images (PDS). But this extension has been implemented "a minima". These images must be uncompressed, and the meta-data header must be inside the file.
Can I load my own Field of View (FoV)?
Yes, you can!
You have two possibilities:
Via a list of graphical regions
Aladin is supporting graphical region definitions (IDL or DS9 syntaxes), it is a simple alternative for displaying a FOV. See the dedicated section.
Via a VOTable file
Aladin can use an XML format for describing instrument field of views (FoV). You can describe your FoV in a simple XML/VOTable document as shown in the example below. And load this file in Aladin to draw it. The user will be allowed to move it, possibly to roll it, switch on/off some FoV components...
This feature can be used to create your own Proposal tool based on this standard and VOApp/VOObserver Aladin Java interfaces (more...). For instance, see APT (STScI HST/JWST Proposal Tool) (demo...)
Click to see detailed examples of VOTable FoV
INT WFC example (thanks to Luis Coral for this example)
       <?xml version="1.0"?>
       <VOTABLE xmlns:xsi="http://www.w3.org/2001/XMLSchema-instance"
        xmlns="http://www.ivoa.net/xml/VOTable/v1.1">
         <DESCRIPTION>INT WFC FoV description</DESCRIPTION>
         <!-- This is the FOV itself (and a utype for that) -->
         <RESOURCE ID="INT_WFC_FoV" name ="INT WFC Field of View" utype="ivoa:characterization/[ucd=pos]/coverage/support" >
           <DESCRIPTION>INT WFC is a mosaic camera. The full
               mosaic is made up of 4 2Kx4100 CCDs in a L-shape design. CCDs are separated
               on the sky by some arc sec gaps. The FoV of each CCD is 11.26 arcmin x 22.55 arcmin.
           </DESCRIPTION>
           <!-- These two complete the Field of View Coordinate system -->
           <PARAM name="FOV Coord Frame" datatype="char"
                   utype="stc:AstroCoordSys/SpaceFrame/SpaceRefFrame" value="J2000.0"/>
           <PARAM name="FOV Coord Flavor" datatype="char"
                   utype="stc:AstroCoordSys/SpaceFrame/CoordFlavor" value="CARTESIAN"/>

           <!-- First row -->
           <TABLE ID="ccd4" name="Field of View">
             <PARAM name="Region" value="Polygon" />
             <!-- here comes the description of the Vertexes in the tilted and recentered frame -->
             <FIELD ID="VRO" name="VertexRAOffset" datatype="float" unit="arcsec"
                 utype="stc:AstroCoordArea/Region/reg:Polygon/Vertex/Position[1]"/>
             <FIELD ID="VDO" name="VertexDecOffset" datatype="float" unit="arcsec"
                 utype="stc:AstroCoordArea/Region/reg:Polygon/Vertex/Position[2]"/>
             <DATA>
               <TABLEDATA>
                 <TR><TD>-342.0</TD><TD>-97.0</TD></TR>
                 <TR><TD>1011.0</TD><TD>-97.0</TD></TR>
                 <TR><TD>1011.0</TD><TD>578.8</TD></TR>
                 <TR><TD>-342.0</TD><TD>578.8</TD></TR>
               </TABLEDATA>
             </DATA>
           </TABLE>

           <TABLE ID="ccd1" name="Field of View">
             <PARAM name="Region" value="Polygon" />
             <!-- here comes the description of the Vertexes in the tilted and recentered frame -->
             <FIELD ID="VRO" name="VertexRAOffset" datatype="float" unit="arcsec"
                 utype="stc:AstroCoordArea/Region/reg:Polygon/Vertex/Position[1]"/>
             <FIELD ID="VDO" name="VertexDecOffset" datatype="float" unit="arcsec"
                 utype="stc:AstroCoordArea/Region/reg:Polygon/Vertex/Position[2]"/>
             <DATA>
               <TABLEDATA>
                 <TR><TD>-342.0</TD><TD>-795.4</TD></TR>
                 <TR><TD>1011.0</TD><TD>-795.4</TD></TR>
                 <TR><TD>1011.0</TD><TD>-119.6</TD></TR>
                 <TR><TD>-342.0</TD><TD>-119.6</TD></TR>
               </TABLEDATA>
             </DATA>
           </TABLE>

           <TABLE ID="ccd2" name="Field of View">
             <PARAM name="Region" value="Polygon" />
             <!-- here comes the description of the Vertexes in the tilted and recentered frame -->
             <FIELD ID="VRO" name="VertexRAOffset" datatype="float" unit="arcsec"
                 utype="stc:AstroCoordArea/Region/reg:Polygon/Vertex/Position[1]"/>
             <FIELD ID="VDO" name="VertexDecOffset" datatype="float" unit="arcsec"
                 utype="stc:AstroCoordArea/Region/reg:Polygon/Vertex/Position[2]"/>
             <DATA>
               <TABLEDATA>
                 <TR><TD>-1038.8</TD><TD>-795.4</TD></TR>
                 <TR><TD>-363.0</TD><TD>-795.0</TD></TR>
                 <TR><TD>-363.0</TD><TD>557.6</TD></TR>
                 <TR><TD>-1038.8</TD><TD>557.6</TD></TR>
               </TABLEDATA>
             </DATA>
           </TABLE>

           <TABLE ID="ccd3" name="Field of View">
             <PARAM name="Region" value="Polygon" />
             <!-- here comes the description of the Vertexes in the tilted and recentered frame -->
             <FIELD ID="VRO" name="VertexRAOffset" datatype="float" unit="arcsec"
                 utype="stc:AstroCoordArea/Region/reg:Polygon/Vertex/Position[1]"/>
             <FIELD ID="VDO" name="VertexDecOffset" datatype="float" unit="arcsec"
                 utype="stc:AstroCoordArea/Region/reg:Polygon/Vertex/Position[2]"/>
             <DATA>
               <TABLEDATA>
                 <TR><TD>-342.0</TD><TD>595.9</TD></TR>
                 <TR><TD>1011.0</TD><TD>595.9</TD></TR>
                 <TR><TD>1011.0</TD><TD>1271.7</TD></TR>
                 <TR><TD>-342.0</TD><TD>1271.7</TD></TR>
               </TABLEDATA>
             </DATA>
           </TABLE>

         </RESOURCE>
       </VOTABLE>
Other possible shapes:
Circle:
       <TABLE ID="maxExtCircle" name="maxExtCircle">
          <PARAM name="Region" value="Circle" />
          <PARAM ID="CRO" name="CenterXOffset" datatype="float" unit="arcsec" utype="stc:AstroCoordArea/Region/reg:Sector/Center[1]" value="0.0" />
          <PARAM ID="CDO" name="CenterYOffset" datatype="float" unit="arcsec" utype="stc:AstroCoordArea/Region/reg:Sector/Center[2]" value="0.0" />
          <PARAM ID="radius" name="Radius" datatype="float" unit="arcsec" utype="stc:AstroCoordArea/Region/reg:Circle/radius" value="159.66021953366922" />
       </TABLE>
Pickle:
       <TABLE ID="FGS1 (outline)" name="HST/FGS1/FGS1 (outline)">
          <PARAM name="Region" value="Pickle" />
          <PARAM ID="CRO" name="CenterXOffset" datatype="float" unit="arcsec" utype="stc:AstroCoordArea/Region/reg:Sector/Center[1]" value="261.6416" />
          <PARAM ID="CDO" name="CenterYOffset" datatype="float" unit="arcsec" utype="stc:AstroCoordArea/Region/reg:Sector/Center[2]" value="238.6036" />
          <PARAM ID="a1" name="StartAngle" datatype="float" unit="deg" utype="stc:AstroCoordArea/Region/reg:Sector/angle1" value="-48.722" />
          <PARAM ID="a2" name="EndAngle" datatype="float" unit="deg" utype="stc:AstroCoordArea/Region/reg:Sector/angle2" value="-130.064" />
          <PARAM ID="rad1" name="ExternalRadius" datatype="float" unit="arcsec" utype="stc:AstroCoordArea/Region/reg:Circle/radius" value="824.9" />
          <PARAM ID="rad2" name="InternalRadius" datatype="float" unit="arcsec" utype="stc:AstroCoordArea/Region/reg:Circle/radius" value="618.25" />
       </TABLE>
Label:
       <TABLE ID="PC1-label">
          <PARAM utype="app:footprint.render.overlay.string" />
          <PARAM utype="stc:AstroCoord.Position2D.Value2.C1" unit="arcsec" value="259.0" />
          <PARAM utype="stc:AstroCoord.Position2D.Value2.C2" unit="arcsec" value="265.0" />
          <PARAM utype="app:footprint.render.overlay.string.content" value="PC1" />
       </TABLE>
Labels are useful to designate the name of CCD chips for instance.
Additional parameters:
You can specify if your FoV can be moved, rolled, its color. You can specify an initial position and an initial roll angle by adding these XML lines:
<VOTABLE... >
<RESOURCE...>
<PARAM name="RA" ucd="pos.eq.ra;meta.main" ref="J2000" datatype="char" arraysize="13" unit=""h:m:s"" utype="stc:AstroCoordSys/SpaceFrame/OffsetCenter[1]" value="13:29:55.7000" />
<PARAM name="DEC" ucd="pos.eq.dec;meta.main" ref="J2000" datatype="char" arraysize="12" unit=""d:m:s"" utype="stc:AstroCoordSys/SpaceFrame/OffsetCenter[2]" value="+47:17:13.00" />
<PARAM name="PA" ucd="pos.posAng" datatype="float" unit="deg" utype="stc:AstroCoordSys/SpaceFrame/PositionAngle" value="0.0" />
<PARAM name="Rollable" value="true" />
<PARAM name="Movable" value="true" />
<PARAM name="Color" value="blue" />
FoV components:
If a <TABLE...> section is inside an embedded <RESOURCE...> section,
Aladin considers the shapes described in this table as sub-component of
the FoV. The users can switch them on/off individually via the plane
properties.
Is Aladin supporting Multiple FITS Extension file (MEF)?
Yes, it is!
Aladin is supporting all FITS files including Multiple FITS Extension files (ascii tables, binary tables, images and tables, ...). If there are more than one extension, Aladin shows the extensions in a folder in the stack. The properties of each plane give access to the specific FITS header. The properties of the folder give access to the primary FITS header.
You can just load a specific extension (or a set of extensions) by suffixing the FITS filename with the extension numbers embedded in brackets and separated by comas. Example:
myMEF.fits[1,4-6,8]
Is Aladin supporting MEF Multi-CCD images?
Yes it is, since release v10.
If your FITS file multi-extension contains multi CCD images, Aladin will display them simultaneously in order to see them as a unique view, in a unique plane stack. When you click on a CCD area, this CCD image will automatically become the astrometric reference for all other CCDs.
Each CCD image has its own background adjustment. If you want to have the same pixel cut, use the pixel form and apply the same constraints on all CCD.
If each CCD astrometric solution is not oriented in the same direction, you can have a surprising rotation effect each time you click on another CCD image.
Is Aladin supporting internal FITS compressions?
Yes, it is, since v11! Aladin is able to load FITS compressed images using GZIP1, GZIP2, RICE1, RICEONE, and HCOMPRESS methods. PLIO is not supported, nor advanced RICE DITHERING method.
Notice that Aladin does not support FITS internal compressions for tables.
Is Aladin supporting graphical region definitions?
Yes, it is!
It is possible to draw various shapes over a sky background by using the
dedicated draw command:
The shapes:
draw line(al1,del1,al2,del2,...[,text])draw polygon(al1,del1,al2,del2,...[,text])draw vector(al,del,size,angle): arrowdraw box(al,del,width,height[,angle])draw circle(al,del,radius)draw ellipse(al,del,semiMA,semiMI,angle)draw arc(al,del,PA,radius,startAngle,endAngle)draw pickle(al,del,radius1,radius2,startAngle,endAngle): double arcdraw dist(al1,del1,al2,del2): distance segmentdraw phot(al,del,radius): photometry circledraw string(al,del,text): textdraw tag(al,del): simple tagdraw tag(al,del,text,dist[,angle,types,textsize]): labeled tag wheretypescan bereticle|bigreticle|smallcircle|circle|bigcircle|arrow|bigarrow|nopole
These command will create a graphical object stored in the last "drawing" plane of the Aladin stack. And if there is no "drawing" plane, a new one will be automatically created. It is possible to explicitly create new graphical planes for packaging together graphical objects :
draw newtool([label]): create a new "drawing" plane calledlabel.draw newfov(al,del[,angle,label]): create a new "FoV" plane calledlabelwhere the center of rotation isal,deland the rotationangle. In this last case, all graphical objects inside this kind of plane will move or roll together.
The coordinate frames:
- setconf frame=ICRS
- setconf frame=J2000|FK5
- setconf frame=B1950|FK4
- setconf frame=Ecliptic
- setconf frame=Gal
- setconf frame=SGal
- setconf frame=B1900
- setconf frame=B1875
- setconf frame=XY : XY coordinates in the current image
All coordinates in a draw command will be interpreted in the last
coordinate frame specified via the setconf command (by default
ICRS). Sky coordinates (al, del) and position angles (for box(),
ellipse(), arc(), pickle()...) are in decimal degrees, angular separations can be
expressed with a unit (without space), e.g. 10°, 5deg, 15', 5"...
A color parameter can be added after the
drawword for providing a specific color to the shape. For example:
draw red circle(180 0 10°);
draw rgb(10,45,120) tag(180 90 "Hello word", 20);
Is Aladin supporting DS9 or IDL regions?
Yes, it is!
Aladin has its own language of region definition via the command script
draw (see the dedicated section),
but starting from release v7.5 Aladin is
also supporting graphical regions definitions in DS9 syntaxes, SAO-image
syntaxes or IDL syntaxes. See the corresponding manuals for more
information.
The shapes:
- line(al1,del1,al2,del2)
- polygon(al1,del1,al2,del2,...)
- box(al,del,width,height)
- rotbox(al,del,width,height,angle)
- circle(al,del,radius)
- ellipse(al,del,semiMA,semiMI,angle)
- ruler(al1,del1,al2,del2)
- point(al,del)
- vector(al1,del1,al2,del2)
- text(al,del) || text=xxx
The coordinate frames:
- fk5 | J2000
- fk4 | B1950
- icrs
- galactic
- ecliptic
- image
The global directives:
- global color=xxx
- composite(al,del,angle)
Some global properties (dash, font...) and some very specific shapes (panda, epanda, bpanda, projection, compass) not supported by Aladin will be ignored.
Is Aladin supporting STC-S regions?
Yes, it is!
STC-S script command
As a script command, Aladin recognizes basic STC-S (IVOA working draft:
http://www.ivoa.net/documents/Notes/STC-S/) regions specifications
(Circle, Ellipse, Box, Polygon, Position) and translates them into
regular Aladin draw commands. However, it does not take into account the
possible operators Union, Intersection, Difference, Not... It always
assumes BARYCENTER reference. Note that the unit specification is
supported.
The STC-S regions can be directly passed as a script command or
preceded by the draw command.
Examples:
STC Circle ICRS BARYCENTER 147.6 69.9 0.4draw STC Box FK4 BARYCENTER 132.5 34.8 0.4arcmin 0.8arcmin
STC-S s_region field
As a field value in a catalog entry, Aladin recognizes STC-S strings
(all kinds of region types, and the Union operator). However, in order
to help Aladin to recognize such a column, the s_region column name
is recommended, and/or the dedicated Obscore utype (see IVOA Obscore
standard for definition).
Is Aladin supporting RGB FITS images?
Yes, it is! Aladin is supporting RGB FITS images for loading and saving.
In fact, the RGB FITS is not really a standard but has been adopted by several tools.
Aladin supports these existing conventions:
-
Aladin considers a 3D FITS cube as a RGB image (Red, Blue and Green components) if the FITS keyword
CTYPE3 = 'RGB 'is specified in the header. In this case any BITPIX value are supported. Without the FITS keywordCTYPE3 = 'RGB 'set, only FITS cubes with 3 frames sharing the same dimension and with aBITPIX=8will be automatically detected as RGB FITS. -
Aladin considers a regular FITS image as a RGB image if the FITS keyword
COLORMOD = 'ARGB 'is specified in the header. In this case the BITPIX must be 32 and the 3 color components will be extracted from each integer by following this convention: bits 31-24: ignored, bits 23-16: Red value, bits 15-8: Green value, bits 7-0: Blue value,
Is Aladin supporting FITS cubes?
Yes, it is!
Aladin can handle CUBES in FITS format. These cubes can be very large, even exceeding the available memory of the machine. It is therefore recommended to increase the RAM used to benefit from a better dynamicity of the interface. Several functions are available for manipulating cubes:
- display them as a movie;
- change the cube orientation (see the
Properties); - extract a specific image from a cube (via the
Duplicate the image planefunction in theImagemenu); - create a cut graph for the third dimension (
specttool - see relevant
FAQ entry)...
- see relevant
FAQ entry)...
From v12 onward, Aladin is interfaced with the spectrum
manipulation software CASSIS, developed by
IRAP. This allows a spectrum to be extracted from a cube based on a
polygon, a circle or a point and analyzed by CASSIS. (see menu Tool -> VO tools)
Aladin also supports colored RGB cubes.
Is Aladin supporting colored cubes?
Yes, it is!
Aladin interprets a FITS cube as a colored cube if the FITS keyword
COLORMOD = 'ARGB ' is present in the header. In this case Aladin will
consider each cube pixel as 4 consecutive bytes (BITPIX=32) for the red,
green and blue components. The first byte (A) is ignored (reserved for
transparency).
Can Aladin display cubes in X-Z rather than X-Y?
Yes, it can!
You can turn (rotate), i.e. change the X,Y,Z orientation of a cube via its Properties.
Notice that this function requires enough memory, at least 2x that of the cube
size.
Where are my preferences saved?
Your preferences (menu Edit -> User preferences...) are
automatically saved in the the file $HOME/.aladin/Aladin.conf using a
very simple ASCII format that you can edit yourself if required.
What is the "measurement histogram"?
Aladin allows you to create easily a histogram concerning the values of a dedicated column of measurements. This histogram is dynamic as you can move your mouse over it for seeing immediately the corresponding sources in the sky.
Usage example:
-
Load Simbad result around M101.
-
Select all the sources (menu
Edit -> Select all objects, orCtrl+A). -
Move your mouse pointer over the
OTYPEcolumn in the measurement frame and wait 1 second. -
Move your mouse pointer over the created histogram for seeing the corresponding sources.
-
Redo for the
Bmagnitude column (numerical values). -
Go over the histogram. Change the binning via the mouse wheel or via the small cursor on the left side.
Thanks to the GALEX Viewer team for this feature idea.
How to use the bookmarks?
Just click on it!
A bookmark is a useful method for launching specific actions. They are shortcuts for predefined script functions. You can use the default bookmarks and/or create your own bookmarks.
The list of bookmarks is displayed on the top of the Aladin main panel
as a list of words, prefixed by a tiny bookmark icon (green
![]() for predefined
bookmarks, and blue
for predefined
bookmarks, and blue ![]() for you own bookmarks). This list is a subset of
available functions which can be browsed, edited and selected via the
menu
for you own bookmarks). This list is a subset of
available functions which can be browsed, edited and selected via the
menu Tool -> Bookmarks..., or by pressing the + character at the
end of the bookmark list.
Concretely a bookmark is a short script identified by a name which can be executed on demand. See the Script Developer section for details on functions and bookmarks.
Since release v10, you can directly create a new bookmark for any
resource provided in the data discovery tree via the small bookmark
icon ![]() displayed at the bottom of the associated "Access selector" window.
displayed at the bottom of the associated "Access selector" window.
How to use the source tagging facility?
The tagging facility allows you to tag some specific catalog sources (resp. graphical tags) in order to come back on them easily. When a catalog (resp. graphical plane) is activated, their tagged objects are automatically displayed in the measurement frame allowing you to click (or double click) on them for recentering the view.
- To tag a source: select it, and click on the check box at the beginning of its measurement line.
- To add a graphical tag: use the
Tagtool and click (not a
click-and-drag, just a simple click) on the position that you want to tag.
and click (not a
click-and-drag, just a simple click) on the position that you want to tag.
The tagged objects are displayed with a magenta small square.
How to use SAMP?
Aladin is SAMP compatible. It means that you can easily exchange data with another SAMP compatible application such as DS9, TOPCAT, WWT ,... or even with Web pages implementing Web SAMP profile (JavaScript API) (see What is SAMP? FAQ question).
You can see at the bottom-right corner of Aladin window an icon
![]() representing a radio antenna. The state of this icon describes the
Aladin SAMP status:
representing a radio antenna. The state of this icon describes the
Aladin SAMP status:
- The antenna is drawn in black
 -> Aladin is SAMP
ready, and connected to a SAMP hub (or internal hub is started);
-> Aladin is SAMP
ready, and connected to a SAMP hub (or internal hub is started); - The antenna is drawn with a red cross
 -> Aladin is
not SAMP ready (not connected to a SAMP hub)
-> Aladin is
not SAMP ready (not connected to a SAMP hub) - The antenna is drawn with waves
 -> Aladin is trying
to connect or disconnect from a SAMP hub;
-> Aladin is trying
to connect or disconnect from a SAMP hub;
You can use the Interop menu or click on the antenna logo to open a
dropdown menu dedicated to SAMP. Use it for specifying your SAMP
preferences.
Note for advanced users: Aladin incorporates a SAMP hub itself (thanks to Mark Taylor). It means that you need not launch an external SAMP hub to be able to send/receive data to/from another application. However if another SAMP hub is always running (such as AstroRuntime from Astrogrid), Aladin will simply connect itself to this existing hub without launching its own. You can also choose from the SAMP preferences to prevent Aladin from launching its internal hub.
Aladin supports (i.e. can process) the following SAMP messages :
image.load.fits: to request Aladin to load a FITS imagecoverage.load.moc.fits: to request Aladin to load a Multi-Order Coverage maptable.load.votable,table.load.fits: to request Aladin to load a VOTable/FITS tabletable.select.rowList: to select a set of objects of a previsouly loaded tabletable.highlight.row: to highlight a given row of a tablecoord.pointAt.sky: point to a specific location in the skyscript.aladin.send: to request Aladin to execute some Aladin script commands (see script section). This command takes as input a parameter called script representing the script to be executed.
Detailed description of the SAMP message types is available here.
Aladin does no longer support PLASTIC (ancestor of SAMP) protocol since v10.
How can I copy-and-paste information (measurements, positions,...)
Aladin provides the classical Edit -> Copy (or Ctrl+C) /
Edit -> Paste (or Ctrl+V) menus allowing you to
copy the current view in order to paste it in another application such
as Impress, PowerPoint... You can also paste any table or image that
you have previously copied from another application.
You can directly copy-and-paste measurements or current location via the contextual dropdown menu (right click) in the system clipboard. Then, you can paste data in any other applications.
Can I draw a pixel cut graph?
The dist tool
![]() computes the distance between two points (menu
computes the distance between two points (menu Image -> Cut graph, or Overlay -> dist - Draw a distance vector), but also it generates a
cut graph along the distance segment. This cut graph is displayed in the
zoom panel at the bottom right side of the Aladin window.
Notice that you have to select one, and only one distance segment to see the corresponding cut graph. If you move the segment or one side of segment, the cut graph is dynamically updated.
If you move the mouse on the cut graph Aladin displays some additional information.
It is not yet possible to save or print this cut graph.
How to "extract" image pixel values?
Aladin v12 has greatly improved the ability to extract pixels
from an image to obtain a table giving the position of each pixel
(ra,dec) and its value. The extraction is done by taking into account a
polygon (draw tool ![]() )
or a circle (
)
or a circle (phot tool ![]() )
that has been previously
drawn on the image. The extraction requires a FITS image, or a HiPS in
FITS mode (HEALPix extraction).
)
that has been previously
drawn on the image. The extraction requires a FITS image, or a HiPS in
FITS mode (HEALPix extraction).
Previous versions of Aladin provided the same functionality but without the possibility to specify the extraction area (= the whole image), and only with classic FITS images (not HiPS).
See menu: Image -> Pixel extraction as a table...
Is it possible to rotate the image?
Aladin allows free rotation of the current view but only if you use a
progressive survey as reference image. In the toolbar, select the pan tool
![]() , click & drag the
image with
, click & drag the
image with Ctrl key pressed, or turn the N-E symbol at the right corner
of the image.
Otherwise, for classical images, you can only force the "North Up" by
clicking on the corresponding button ![]() at the left bottom corner of
Aladin.
at the left bottom corner of
Aladin.
Is it possible to save a cube?
Unfortunately, no.
Neither in FITS nor in MPEG or other movie standards.
Is it possible to extract a spectrum from a cube?
Yes it is.
Load the cube, and use the menu Image -> Spectrum extractor... or
directly via the button spect
![]() in the tool box. The resulting
spectrum will be displayed in the right bottom panel, a horizontal red
bar in this spectrum shows the position of the current cube frame. You
can change the extraction position by a click&drag on the associated
cross displayed over the cube.
in the tool box. The resulting
spectrum will be displayed in the right bottom panel, a horizontal red
bar in this spectrum shows the position of the current cube frame. You
can change the extraction position by a click&drag on the associated
cross displayed over the cube.
From v12 onward, Aladin is interfaced with the spectrum
manipulation software CASSIS, developed by
IRAP. This allows a spectrum to be extracted from a cube based on a
polygon, a circle or a point and analysed by CASSIS (see menu Tool -> VO tools).
Is it possible to build a mosaic image?
There are three methods for building mosaic images.
- Overlays:
- The first method just uses the transparency feature in Aladin for
displaying simultaneously several images in the same view. This solution
is easy to use, fast but it is based on the 4 image corners positions -
so it can have small distortions. You just have to set the
"Overlay opacity" to 100% in the Properties of each image,
or adjust the
opac.slider under the Aladin stack. - Basic resampling:
- The second method is a classical resampling. It allows you to combine
several images for producing a unique large image by resampling them in
a unique astrometric solution.
This resampling method only takes into account the visual rendering in 8bits of the original images. The resulting image cannot be used for photometric computations or other manipulations that require access to the original pixel values.
- Progressive survey:
- Also, Aladin allows you to generate yourself a progressive survey from a set of FITS images. The generated product is called HiPS for Hierarchical Progressive Survey. It provides you a multi-scale view of your data allowing you to browse them -> Zoom and Pan as a unique image. This last method is very powerful either for large survey covering a large part of the sky or for pointed observations for which you would like to have a global view. For the details, see the HiPS section.
Is it possible to add, subtract, multiply or divide images?
Yes you can!
Aladin is supporting addition, subtraction, multiplication, division, convolution and pixel normalization. If necessary the second image will be resampled according to the astrometric solution of the first image.
Use the menu Image -> Arithmetic operations...
You can also use the script commands: + , - , * , / (see the corresponding
script help - Ctrl+F5).
For subtracting one image from another you can also do a colorized
subtraction, select both of them in the stack and press the rgb button
![]() .
Then, select the
.
Then, select the images subtraction selector. Aladin provides you a colored
image for which the positive differences are displayed in one color
component (for instance red), and the negative differences in another
color component (for instance green). The resulting pixel dynamics is
automatically increased (linearly) to get a better contrast of the
differences. You keep access to the original pixel values from the 2
original images just by moving the mouse cursor over the colored image.
You can use the
RGBdiffscript command which does the same thing from the command line.
In case of progressive surveys, you need to crop the field before processing it.
Can I come back to previous targets?
Yes you can, since release v10!
Have a look on the right bottom panel. Aladin provides you with the history
of the targets that you visited. Click on the small triangle
![]() to open a
dropdown list of previously visited targets.
to open a
dropdown list of previously visited targets.
Note that you can append manually the reticle position as a new target
by pressing the "location" icon
![]() at the left side of this triangle.
at the left side of this triangle.
Is it possible to change the display epoch?
Yes, there is!
If you are manipulating a catalog for which the proper motions of the
sources are provided, use the epoch slider (J2000 value by default) at the bottom of the
Aladin stack to change dynamically the epoch of the drawing sources.
Note that you have to select the catalog plane before sliding (by
clicking on its stack name).
If it is known, the default J2000 epoch is replaced by the epoch of the
background image (from the EPOCH or DATE-OBS FITS keywords).
For resetting the epoch, just click on the slider's label.
Is it possible to change the original epoch?
Yes, it is possible, since release v10!
If you are manipulating a catalog for which the proper motions of the
sources are provided, and without original epoch, Aladin assumes J2000.
However you can manually modify this default epoch: menu Catalog -> Column information, Epoch field.
Is there a way to convert object coordinates?
Yes, there is!
Move the cursor on the object data line in the measurement window. The
position of this object is automatically given in the current coordinate
reference system in the Command field (just below the menu). So, if
you select say, the Gal reference system and move the cursor on the
object data you will see their positions in Galactic system.
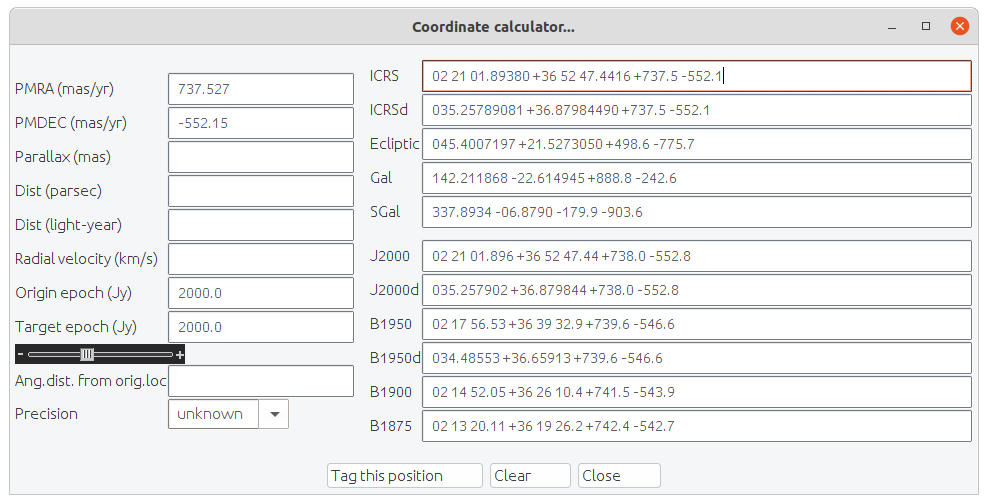
The Aladin coordinate calculator window can be opened from the menu Tool -> Coordinate calculator...
Additionally, you can use the Coordinate calculator available via the
Tool -> Coordinate calculator... menu. A simple click on a data line will fill
up this form providing you simultaneously, in all available reference
frames, the location of the associated source. Thanks to this toolbox,
the proper motion, the radial velocity, the parallax and the epoch can
be manipulated.
Is there a way to convert date values?
Yes, there is!
Aladin v12 adds a small tool for manipulating date values. It is
accessible through the Tool -> Time calculator... menu. It allows to
convert a date according to ISO, JD, MJD, Julian years and Besselian
years formats.
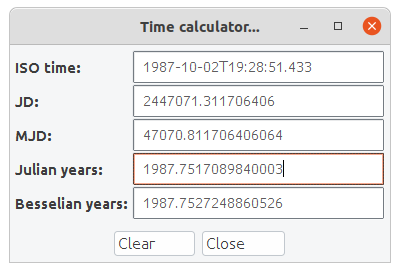
The Aladin time calculator window can be opened from the menu Tool -> Time calculator...
What is the Simbad pointer?
Via the menu Tool -> Simbad pointer, Aladin will continuously
query Simbad data base and search for an astronomical object close to
the location pointed by the mouse. You have just to click and to let the
mouse pointer at the same place 3 seconds to wake up the Simbad pointer.
If there are several objects, Aladin retains the object with the most
bibliographic references.
The Simbad information will be displayed as a "clickable" sticker over the image. Click on it for loading the full Simbad result concerning this object or to retrieve the list of bibliographic references associated to this object by the CDS team.
Since v10, this function can be directly activated via the
study icon (SIMBAD pointer is activated when the icon is
orange ![]() or green
or green ![]() ),
at the bottom left of the view panel.
),
at the bottom left of the view panel.
Check out this video tutorial for more information:
What is the VizieR photometry pointer?
Via the menu Tool -> VizieR photometry pointer, Aladin will
continuously query VizieR data base and search photometry measurements
from various catalogs around the location pointed by the mouse. You have
just to click and to let the mouse pointer at the same place 3 seconds
to wake up the VizieR photometry pointer.
If the Simbad pointer is also activated, the VizieR query will be done around the nearest Simbad object. Otherwise, the query will be done with the real mouse coordinates.
The VizieR photometry information are displayed as a "clickable" scatter plot (wavelength vs flux) displayed in the zoom frame location. It provides you a fast an easy method for retrieving an approximated flux signature of the object under the mouse. Take care that this plot IS NOT the SED (Spectral Energy Distribution) of the source, just a few photometry measurements around the position (not necessarily really associated to the same object, with various calibration methods...)
A simple click in this plot generates the associated photometry table,
displaying both the individual measurements and the corresponding
location. This table can be manipulated as any classical table in Aladin
(save, column manipulation...). For more advanced photometry
manipulation, the last button (+) in the photometry scatter plot opens on the
same data in your web navigator a more advanced photometry tool.
Since v10, this function can be directly activated via the
study icon (VizieR pointer is activated when the icon is
green ![]() or blue
or blue ![]() ),
at the bottom left of the view panel.
),
at the bottom left of the view panel.
How to make Aladin more verbose?
Aladin has 6 trace/debug modes... This is interesting to see how it
works and what it is doing. Just type the following script command in
the "Command field": trace x where x can be 1, 2, 3, 4, 5, 6
or off.
The messages will appear both in the console window in which you launched Aladin. In level 6, the HiPS display strategy is visualized directly in the view.
Can I use Aladin without a network connection?
Yes, you can!
In this case, you can use only your own data.
However, the time required to detect that there is no network varies
between a few seconds up to more than 1 minute (depending on your JVM
and depending on your network configuration). Therefore, you can start
Aladin with -local parameter to avoid waiting for the network time
out.
Tip: In progressive mode (HiPS surveys), Aladin stores in a local cache (
$HOME/.aladin/Cache/Background) your last surveys access. This local cache remains available even you have no network, allowing you to redisplay your favorite region.
Can I reload the server descriptions without restarting Aladin?
Yes, you can. For instance if you have started Aladin with a network connection not yet ready.
Go to the menu Edit -> User preferences... and press the
Reload button in the Registry site section.
Can I pass additional Java options when I launch Aladin?
Yes you can!
But it depends on your configuration. See the examples provided for increasing Java memory in the corresponding FAQ entry.
Can I run Aladin via a http proxy?
Yes you can!
If you want to run Aladin via a http proxy then you should execute it with the following command:
java -Dhttp.proxyHost=###.##.###.## -Dhttp.proxyPort=## -jar Aladin.jar
where the ###.##.###.## and ## correspond to the proxy ip address and port number.
(Thanks to John D. Tanner for this tip)
Can I run Aladin via a SOCKS5 proxy?
Yes, you can.
If you want to run Aladin via a SOCKS5 proxy, execute it with the following command:
java -DsocksProxyHost=<proxy-hostname> -jar Aladin.jar
Example :
the following command will start a local SOCKS5 proxy:
ssh -D 1080 remote-hostname
You can then launch Aladin with:
java -DsocksProxyHost=localhost -jar Aladin.jar
Which are the Aladin command line parameters?
Available command line parameters can be known by launching Aladin with
the -help parameter (java -jar Aladin.jar -help).
Click to see the help obtained with this command.
    Usage: Aladin [options...] [filenames...]
           Aladin -hipsgen ...
           Aladin -mocgen ...
           Aladin -help
           Aladin -version

       Options:
           -help: display this help
           -version: display the Aladin release number
           -local: without Internet test access
           -theme=dark|classic: interface theme
           -location=x,y,w,h: window position & size
           -treewidth=w: default tree panel width (0=closed)
           -screen="full|cinema|preview": starts Aladin in full screen
                   cinema mode or in a simple preview window
           -script="cmd1;cmd2...": script commands passed by parameter
           -nogui: no graphical interface (for script mode only)
                   => noplugin, nobookmarks, nohub
           -noreleasetest: no Aladin new release test
           -nosamp: no usage of the internal SAMP hub
           -noplugin: no plugin support
           -[no]log: with/without anonymous statistic reports
           -[no]beta: with/without new features in beta test
           -[no]planet: with/without planetary data
           -old: obsoleted facilities re-activated (without any warranty)
           -trace: trace mode for debugging purpose
           -debug: debug mode (very verbose)

           -hipsgen: build HiPS by script (see -hipsgen -h for help)
           -mocgen: build MOC by script (see -mocgen -h for help)

       The files specified in the command line can be :
           - images: FITS (gzipped,bzipped,RICE,MEF,...), HEALPix maps, JPEG,GIF,PNG
           - tables: FITS, XML/VOTable, CSV, TSV, S-extractor, IPAC-TBL, Skycat or ASCII tables
           - properties: properties record list for populating the data discovery tree
           - graphics: Aladin or IDL or DS9 regions, MOCs
           - directories: HiPS
           - Aladin backup : ".aj" extension
           - Aladin scripts : ".ajs" extension
New since v12: -[no]planet.
Can I define/query other servers than Simbad/Aladin/VizieR/...?
Yes you can!
To do that, you have to write new server definitions in an additional
file and load this file in Aladin (for instance, use the script command
load yourfile).
The servers have to be accessible by a simple URL with a HTTP GET
method. The syntax required for these server definitions follows the GLU
recommendations. Adapt this short example to your own needs :
%ActionName        Foo
%Description       My own server definition
%Aladin.Label      MyServer
%Aladin.Menu       Others...
%Aladin.LabelPlane MyServer $1/$2
%Url               http://xxxx/yyy?ra=$1&dec=$2&radius=$3&color=$4...
%Param.Description $1=Right Ascension
%Param.Description $2=Declination
%Param.Description $3=Radius
%Param.Description $4=Color
%Param.DataType    $1=Target(RA)
%Param.DataType    $2=Target(DE)
%Param.DataType    $3=Field(RADIUS)
%Param.Value       $3=14.1 arcmin
%Param.Value       $4=Red
%Param.Value       $4=Blue
%Param.Value       $4=Infrared
%Aladin.filter     filter Mag.Circle { draw circle(-${Mag}) }
%Aladin.filter     filter Prop.motion { draw pm(5*${pmRA},5*${pmDE}) }
%ResultDataType    Mime(image/fits)
-
%ActionName: Unique identifier -
%Description: Server description -
%Aladin.Label: Button or menu label -
%Aladin.Menu: label of upper-level button (in case of a submenu) -
%Aladin.LabelPlane: Template of the plane label.$nwill be replaced by the corresponding parameters. -
%Url: Server URL template with$nvariables specifying the fields which have to be filled up by the users. -
%Param.Description $n=: Description of the field numbern. -
%Param.DataType: Data type of the corresponding parameter. The available formats are:.Target(COO[b|d] | RA[b|d|h|m|s] | DE[b|d|dg|m|s] | SIMBAD | NED): sky target.Field(RA[d|s] | DE[d|s] | SQR[d|s] | RADIUS[d|s]): field size.Input(IMG|CAT): image or catalog url corresponding to Aladin plane data. ForCOO,RAandDE,bextension is for blank separator instead of":"anddands, extension for degrees (resp. arcsec) instead of defaults (sexagesimal representation for position and arcmin for the field unit).RAh,RAm,RAsandDEdg,DEm,DEsinTargetexpression can be used for sexagesimal representation split in 6 fields. It assumes that coordinates are in J2000 frame. -
%Param.Value: Default value or list of available values for the corresponding parameter. -
%Aladin.filter[#One line comment]filter name { filter.definition }: this field is optional. It allows the data provider to describe some dedicated Aladin filters (see thefilterscript command, and filters documentation) that could be applied on its data. -
%ResultDataType Mime(*xxx*): To specify the data type provided by the server. For images:image/fits- fits file,image/gfits- gzipped fits file,image/hfits- hcompressed fits file, and for data:text/plain,text/tsvortext/csvfor data in tab separated value syntax andtext/xmlfor data in XML/VOTable syntax (see the corresponding sections) andsia/xmlfor SIA results (Simple Image Access).
The servers that you have defined will be accessible by the buttons of the server selector window.
Can I define/append my own data collections in the discovery tree?
Yes you can!
Since v10, Aladin can append a new branch called Adds in its
discovery tree for local collection definitions. Each of these
collections must be described by a properties record following the
vocabulary described in this IVOA document.
Several records can be grouped
together in a single file, separated by empty lines and loaded in Aladin.
Example of properties record:
ID                   = yourAuhority/your/id
obs_title            = The title of your collection (a few words)
obs_description      = The description of your collection (a sentence or a short paragraph)
tap_service_url      = http://your/tap/url
The service URL can be replaced/completed by one of these alternatives:
sia_service_url      = http://your/sia/url
sia2_service_url     = http://your/sia2/url
ssa_service_url      = http://your/ssa/url
cs_service_url       = http://your/conesearch/url
hips_service_url     = http://your/hips/url
How to visualize/edit/save the FITS header?
Select the plane of this image in the plane stack by clicking on its
name and press select the menu Edit -> Fits header... (or Alt+H).
With Multiple Fits extensions, each FITS extension is inserted in a "folder" in the Aladin stack. The folder plane gives access to the main FITS header if there is one.
Not only FITS images can provide FITS header: you can visualize the FITS header for JPEG or PNG images if these images have an astrometric calibration embedded in the "comment segment" either in FITS syntax or in AVM syntax (see the relevant FAQ item).
It is also possible to edit and save the FITS header.
What can I do with the "stack sliders"?
Aladin provides several control sliders displayed at the bottom of the Aladin stack.
They allow to:
-
J2000orepoch: adjust the epoch of sources (if proper motions are available); -
size: change the graphical object size; -
dens.: increase/decrease the source density of HiPS catalogs and/or the display resolution of MOC; -
cube: change the current cube frame; -
opac.: modify the plane opacity factor; -
zoom: increase/decrease the zoom factor.
Not all sliders are displayed by default. Use your preferences
(menu Edit -> User preferences...) for adjusting this configuration.
What is hidden behind the Shift and Ctrl keys?
In order to keep the Aladin interface as simple as possible, some
features are hidden and require the usage of the Shift and Ctrl keys.
Here is what you can do:
1) With Shift:
-
Remove several views and/or planes at a time: specify several views by clicking on them or several planes by clicking on their name, with the
Shiftkey down. After that, press theDelbutton (without the
 Shiftkey pressed). -
Remove all views and/or planes: With the
Shiftkey down, press theDelbutton
to remove all views. If there are no views, all planes
will be removed. -
Select several sources not in the same rectangular area: maintain the
Shiftkey down during the selection. -
Select several views: (only in multiview mode) maintain the
Shiftkey down and click in each view.
2) With Ctrl:
-
Copy a view: with the
Ctrlkey down, a click & drag between two panels (multiview mode) duplicates the original view. -
See all the image: click in the Zoom Frame (at the bottom-right of the screen) with the
Ctrlkey down to automatically adjust the zoom factor in order to see all the image in its view. -
Force the reticle moving: with the
Ctrlkey down, a click in the view (or one view in multiview mode) moves the reticle (large magenta cross) even if there are "selectable" graphical overlays at this position. -
Select all views: press
Awith theCtrlkey down.
How to use the plane stack?
The plane stack allows you to control the view display. Each plane stores the result of a server query (image, tables, progressive surveys) or possibly some additional graphics. The eye of the observer is at the top of the stack and sees the projection of all active planes.
-
Click on a plane icon to activate (or deactivate) the plane.
-
Click on a plane name to select it; then the tool buttons which are authorized for this kind of plane are activated. Maintain the
Shiftkey to select several planes together. -
Click and drag the plane icons in the stack to change the order of the display.
-
Click and drag the sliders at the bottom of the stack for adjusting respectively the opacity level, the size of objects, or the zoom factor.
-
Click and drag the plane icon from the stack to a view panel (especially in multiview mode) to create a new view for this plane (see the multiview section).
-
Organize your data in folders (via the dropdown menu).
By moving the mouse pointer over the icon/name, you will get additional plane information displayed at the top of the stack panel.
Check out these video tutorials for more information:
Why do the plane stack checkboxes sometimes disappear?
Since Aladin v7.5, the checkboxes controlling the reference plane associated to each view are displayed only if there is a possibility to choose another reference plane. Otherwise, the checkboxes are removed to simplify the stack usage.
You can force a plane -- even a catalog plane -- to be a reference for a view just by clicking and dragging the plane icon from the stack to a view panel.
How to use the multiview mode?
Aladin allows you to display simultaneously several views (2, 4, 9 or 16
views). You control the number of view panels via the multiview
controller ![]() at the bottom left of the Aladin screen or via the menu
at the bottom left of the Aladin screen or via the menu
View -> Panels -> ....
Each view uses its own reference projection (typically the projection of the base image in the view) and its own zoom factor. Catalogues and graphical overlays will be projected according to the projection/zoom factor for each view. Except for progressive surveys, it is possible to create several views for the same image with different zoom factors.
The simplest method to specify the reference image of a view is to click and drag the image plane logo from the Aladin stack to the view panel. You can use also a catalogue instead of an image.
The number of views is not limited. When you have created several views but some of them are not visible, you can access them via the vertical scrollbar at the right side of the view frame. Only the displayed views use memory, the invisible views do not spend any memory.
Selection: A green border around the view panel and an associated highlighted name in the stack plane shows you the correspondence between the views and their reference planes. Move your mouse on a view or on a stack plane to see these correspondences.
A blue border shows you the selected view(s) for which an action can be
operated (del, pixel, zoom, rgb, assoc). Click on a view to select it.
Maintain the Shift key to select several views.
Match scales & orientation: If you just press the match button
![]() under the main panel (or via the menu
under the main panel (or via the menu View -> Match scales and orientation, or Alt+Q), Aladin automatically selects all views
compatible with the current view and displays them in the same
astrometric solution (based on 4 corners projection) until you deselect
this function.
Move or Copy: You can move a view from a panel to another one just
by clicking on its border and dragging it from the original panel to a
new one. Also, if you maintain the Ctrl key pressed during this
operation, the view will be duplicated.
Is it possible to overlay an image to another one?
Yes, you can.
If you have at least two images in the stack covering the same region,
and you select the upper one, you will activate the opac. slider
at the bottom of the stack. If you click & drag it, you will
increase/decrease the opacity level of the corresponding image. And by
this way you will overlay this image on the other one.
You can also use the small slider available at the bottom of each plane
logo, or open the properties of this image for using a larger slider
(prop button ![]() ).
).
In multiview mode, the image for which the opacity level has been modified can be drawn over several views depending on the stack order (if this image is not used as "a reference" in another visible view)
The image overlay is not a full resampling (better but slower), the four corners are reprojected and the image is drawn by a simple affine transform method. For large images (greater than one degree) the overlay will be distorted.
Sometimes I cannot overlay two images. Why?
Aladin allows you to superimpose several images by modifying the opacity level of the images located above others in the Aladin stack. However, if the above image is itself used as a reference for another visible view (see multiview mode), Aladin deactivates automatically the opacity mechanism for allowing side by side comparison.
Do I need a three-button/wheel mouse?
Three buttons are more useful because some usual functions will be directly available via the mouse:
-
Left button: for selecting sources and graphical objects
-
Middle button: for panning
-
Right button: for adjusting the pixel contrast
-
Wheel : for zooming
All these functions are also available via the tool bar.
How to use the mouse wheel zoom?
The mouse wheel zooms or unzooms the current view. When it increases the zoom factor, Aladin centers the new view on the reticle position. So the best way to use the mouse wheel is to proceed in two (or three) steps:
-
click on the position (astronomical object) where you want to zoom;
-
turn the mouse wheel...
-
... and in multiview mode, Aladin will adjust the size of all selected views.
How to use the "Command" field?
The Command field is located below the Aladin menu. It is used for several purposes:
Script command: You can launch any Aladin script command from this field. At the right side of the field a small triangle allows to open a dropdown menu providing the history of all script commands executed by Aladin, either real script commands or script commands equivalent to the actions done thanks to the graphical interface.
Coordinate location: If you write coordinates into the Command
field and press the RETURN key, the "reticle" (the small magenta
cross) will be moved at this position.
Loader: If you write a file name or an URL and press the RETURN key, Aladin will load the corresponding data (images, catalogs,...).
Object resolver: If you write an astronomical object identifier and press the RETURN key, Aladin will ask to the Sesame name resolver (Sesame=Simbad+VizieR+NED) to retrieve the corresponding coordinates, and the "reticle" will be moved at this position.
If there is no image and data loaded yet, Aladin will load automatically an image around this position (by default DSS colored - see
Edit -> User preferences...for modifying this default).
Time range: If you write two dates (ISO syntax) into the Command
field and press the RETURN key you will modify the current range of
time. All data outside this time range will be no longer displayed in
the views.
Locator: when your mouse is on the current view, the field displays the location of the mouse pointer in the view. This location is given in the current coordinate system, by default ICRS in sexagesimal syntax. When your mouse is in the measurement frame, the field displays the coordinates of the astronomical object under the mouse pointer. If you click on it, these coordinates are memorized and can also be picked up from the Command field.
What does "supporting time" mean for Aladin v11 and following?
As well as you can control the space region that you want to display,
since Aladin v11, you can also control the time range. Obviously, only
the data with an associated time will be impacted by this time control,
especially the catalogs and tables containing an epoch column, and the
Time coverages (TMOC or STMOC). A small clock icon
is drawn on the relevant planes in the stack, e.g.:
![]() ,
,
![]() ,
,
![]() .
.
The current time range can be specified by hand with two ISO dates (e.g.:
2001-12-20T10:00 2004-07-31) provided on the Command field. When a time
range has been set, it can be adjusted with mouse actions on the time
controller displayed under the space controller in the right bottom
zoom panel.
In a time range expression, it is possible to replace one ISO date by
the keyword NaN to remove a bound. The string NaN NaN fully
removes the current time range.
Note that Aladin also supports time plots.
Can I draw a time plot?
Yes, you can! Since release v11.
When you load time data in the stack (for instance a catalog with an
epoch column, or a time coverage TMOC or STMOC), Aladin draws a small
clock on the associated stack logos showing you that you can generate a
time plot based on these data. You have to press the x-y scatter plot
button ![]() ,
or select the menu
,
or select the menu Catalog -> create a scatter/time plot.
After that you can choose which measurement has to be drawn for the Y
axis. Notice that the mouse wheel is a funny method for quickly changing
this selection.
Can I draw a contour?
Yes, you can!
- Automatically:
- Aladin provides a self-extracted contour feature. Select the
conttool and follow the instructions.
 - Manually:
- To make a contour, use the
Drawbutton .
You have two modes:
.
You have two modes:
- click-and-drag mode: draw a "hand-line"
- click-and-click mode: draw a "poly-line". You have to move the cursor out of the view to end the polygon.
You can move a manual contour with the
selecttool by
clicking-and-dragging one of its control points. It means that you
have to select the contour and after that click-and-drag one of
these control points (little squares on the contour).
by
clicking-and-dragging one of its control points. It means that you
have to select the contour and after that click-and-drag one of
these control points (little squares on the contour).
These contours are memorized with astronomical positions. It means that you can display them on another image with a possibly different resolution.
If the background image is a HiPS, the contour extraction is possible, but done on the current view only.
Can I change the colour map?
Yes, you can!
Click on the pixel button ![]() or use the menu
or use the menu
Image -> Pixel contrast & map (or Ctrl+M).
You can reverse colours, apply false colours, adjust the pixels
dynamics and/or select a transfer function (Asinh, Log, Sqrt,
Linear, Pow2...).
Also, the user can visualize where a specific level of pixels is
located in the image just by moving its mouse pointer through the
Color map band in the pixel information window. The corresponding pixels
will be drawn in blue color and the others in gray levels.
The user can also quickly adjust the pixels dynamics by clicking-and-dragging the right mouse button directly in the view - "a la DS9".
Recent Aladin versions (v9 and following) add new facilities, notably:
- you can switch between the preview pixel mode and the full pixel
dynamics mode (if it is provided for the current image or HiPS) either
via the pixel form or thanks to the
hdricon under the main panel;
 - in full pixel dynamics mode, it is possible to recompute the current cut
range based on the currently visible view (button
local cut); - it is possible to modify simultaneously the colour maps for all selected images in the stack.
Can I do a X-match between two catalogs?
Yes, you can!
You have two methods: locally or remotely.
1) Local X-match
A local X-match allows you to cross-correlate 2 catalogs already loaded
in the Aladin stack. You access to the dedicated form thanks to the menu
Catalog -> Cross match objects..., or directly via the cross
button ![]() in the tool bar. This x-match can be based on common column
values, or made by position, with (or without) a systematic error or an
error ellipse. Note that this correlation engine is limited by the RAM
of your machine.
in the tool bar. This x-match can be based on common column
values, or made by position, with (or without) a systematic error or an
error ellipse. Note that this correlation engine is limited by the RAM
of your machine.
2) Remote X-match
Since the release v10, Aladin allows you to use the remote CDS X-match server in order to correlate one of your local table/catalog with a remote one hosted at CDS. This new feature is available directly in the "Access selector" window under the checkbox "by CDS Xmatch" appearing when you select a data collection from the Data Discovery Tree. In this case, the table currently selected in the stack will be sent to CDS X-match server. This server will do the Xmatch with the designated table/catalog, and the result will be provided as a new catalog plane, incorporating all columns from your previous table and the x-correlated one. In this case there is no RAM limitation except the size of your own table.
Can I define and load my own colour map?
Unfortunately not yet! Certainly in a next release.
However, if you use the IDL Aladin library, you can send an IDL colormap to Aladin (see the IDL FAQ item). Also, if you have an interesting colormap not yet in Aladin, do not hesitate to send it to us (3 arrays of 256 values in [0..255], for the red, green and blue components).
Can I reverse the image colours?
Yes, you can!
Click on the pixel button ![]() and click on the
and click on the Reverse checkbox.
Can I control the grid parameters & and other overlaid info parameters?
Yes, you can, either via the menu Edit -> User preferences..., or via the
setconf script command. Since the release v12, you can also adjust
the thickness of the grid.
Can I display the color map?
Aladin allows you to display the current color map over the image (menu
Overlay -> Color map). You can click on this colormap tool to modify
its position or its size. Just by moving the mouse over it, you will
"paint" temporarily the image pixel region corresponding to the color map
value under the mouse pointer.
How to do a photometry measurement?
Aladin has two tools supporting photometric measurements. These tools
are associated to the phot tool ![]() and to the
and to the draw tool ![]() . These
tools offer both manual pixel statistics and local source extraction
capability:
. These
tools offer both manual pixel statistics and local source extraction
capability:
-
Local source extraction: If your background image is a classical FITS image (not a HiPS), with the
phottool ,
click on a source.
Aladin will draw an ellipse based on a local extraction of this
source. If you select this source, Aladin displays the associated
measurements (central position, background estimation, peak
level, ...)
Thanks to P. Grosbol's "Image Quality Estimate" original code from
ESO.
,
click on a source.
Aladin will draw an ellipse based on a local extraction of this
source. If you select this source, Aladin displays the associated
measurements (central position, background estimation, peak
level, ...)
Thanks to P. Grosbol's "Image Quality Estimate" original code from
ESO. -
Manual pixel statistics: Select the
phottool in the tool bar
and click on a star and drag until the drawn circle is covering all
the star. Aladin will compute the sum, the average, the median, the
sigma and the surface of the embedded pixels. In a same way, select
the drawtool,
and draw an area. Close your shape by clicking again
on the first point.Tip: If you zoom enough on your photometric shape, the concerned pixels are tagged with a small circle.
Aladin v12 introduces several new features for photometry. It is
now possible to use the manual photometric measurement tools on both
conventional FITS images and HiPS surveys if they are displayed in full
pixel values mode (FITS tiles). Statistical measurements can be stored
by clicking on the Save icon
![]() that appears on top of the histogram of
values. These measurements and the associated geometric area will be
saved in a table that can be manipulated like any other plane using
tabular data. It is also now possible to extract each pixel value of a
given graphic area in the form of a table memorizing the position in ra
and dec and the associated pixel value (menu
that appears on top of the histogram of
values. These measurements and the associated geometric area will be
saved in a table that can be manipulated like any other plane using
tabular data. It is also now possible to extract each pixel value of a
given graphic area in the form of a table memorizing the position in ra
and dec and the associated pixel value (menu Image -> Pixel extraction as table...)
Can I change the object size/colour/shape...?
You have three solutions:
-
By clicking on the
propbutton .
The properties window concerns
only the selected graphical object, or the selected plane if there
is no individual object selected.
.
The properties window concerns
only the selected graphical object, or the selected plane if there
is no individual object selected. -
You can also change the object size/colour/shape via a
filter. In this case you will constrain this size or colour according to column values. This way you can draw circles proportional to the magnitude, ellipses for galaxy dimension, etc. (See the detailed filter documentation.) -
Via the
setscript command (example:set Simbad shape=cross)
Can I create or modify image astrometric calibration?
Yes you can.
Select the image in the plane stack by clicking on its name and select
the menu Image -> Astrometric calibration.... Then, edit or
create a new astrometric reduction either by parameters, by star
matching or by editing directly the WCS header.
By script, you can use the set command with the dedicated prefix
FITS. For instance, set MyImg FITS:CRPIX1=400 will modify the pixel
reference coordinate of the first axis.
Can I change the BITPIX of a FITS image...?
Yes you can!
Use the menu Image -> Bitpix convert..., or the script command
bitpix.
Can I change the column order of the catalog measurements?
Yes you can, since the release v10.
Use the two arrows buttons displayed at the bottom of the Column information... window. This window is available via the menu Catalog,
or directly via the dropdown menu (right-click) associated to the
measurement panel.
Can I specify which columns Aladin must use for RA and DEC?
You have 2 solutions: manually, or programmatically.
Manual RA and DEC designation
Use the second column (Ref) in the table of the Column information... window. This
window is available via the menu Catalog, or directly via the dropdown
menu (right-click) associated to the measurement panel.
By clicking in the second column Ref for the appropriate field, you will be
able to specify if this field contains RA, DEC, PMRA, PMDEC, X or Y
information.
You can also select GLON, GLAT and SGLON, SGLAT for galactic and
supergalactic coordinates.
Programmatic RA and DEC designation
If you can control the format of your catalog, choose a VOTable format
with a COOSYS element (see the IVOA VOTable standard).
Can I specify which column Aladin must use for the date?
As for coordinates, you have 2 solutions: manually, or programmatically.
Manual date designation
Use the second column in the table of the Column information... window. This
window is available via the menu Catalog, or directly via the dropdown
menu (right-click) associated to the measurement panel.
By clicking in the second column at the appropriate field, you will be
able to specify if this field contains dates and the syntax/system of
these dates: JD - Julian Day, MJD - Modified Julian Day, ISOTIME -
calendar date in ISO format, YEARS - decimal years, DATE - regular
calendar date.
Programmatic Date designation
If you can control the format of your catalog, choose a VOTable format
with a TIMESYS element (see IVOA VOTable 1.4 standard).
Can I modify the catalogue projection?
By default, the catalogue projection is determined by the astrometric
solution of the background image. But if you have no image (only the
catalogue) Aladin uses a default projection: TAN for small fields, ZEA
for middle size fields and AITOFF for the whole sky.
You can change this projection via the "Properties" of the catalogue plane.
Can I project a catalog on one image only?
This question makes sense only in multiview mode.
By default, a catalog is projected on all compatible views for which the reference plane is under the catalog plane into the Aladin stack. But if you move the catalog plane and the reference (image) plane into the same stack folder, you can limit the projection for this image only.
Open the folder's properties and select the "local scope" attribute instead of the "global scope" attribute. The folder with local scope behaviour is drawn like a closed envelope.
You can modify this property via the
setscript command:
set FolderName scope=local|global
Can I abort a query?
Yes, you can!
If you delete a plane that is currently being loaded, Aladin will
interrupt the current query before deleting the plane.
From v11 onward, if the data is tabular, Aladin will additionally ask you if you do actually want to delete the plane, but instead only interrupt the current query and display the data already collected.
I do not want the new dark theme user interface
By default, since v10 Aladin starts with a new dark theme
(darkgray background...). However, you can modify this default theme
either via the user preferences (Menu Edit), or by the command line
parameter -theme=classic|dark.
This last method may be useful, notably if you are controlling Aladin from another Java application using a classical GUI theme.
Hierarchical Progressive Survey (HiPS)
What does Progressive Survey mean?
Since v7, Aladin provides access to progressive sky surveys with the capability to zoom and pan on any region. This kind of surveys are called HiPS for Hierarchical Progressive Survey. This mode allows you to see a survey at any scale, even the whole sky.
It can take into account all-sky or wide image surveys, cube surveys, catalog surveys and density maps.
HiPS has been invented by the CDS in 2009 and are described in this paper 2015A&A...578A.114F. It is an IVOA standard since 2017: http://ivoa.net/documents/HiPS/. HiPS is used by a lot of compatible clients notably Stellarium, WorldWide Telescope, KStar, ...
How do I control a HiPS display?
In "progressive mode", the best way to control the display requires a mouse :
- one click to move the reticle;
- double click to recenter the view on the reticle;
- mouse wheel to zoom/unzoom;
- click & drag with the left or middle button to pan.
In case of active graphical overlays, such as a catalog, the pan with a left click & drag will be disabled for allowing the selection of the sources. In this case, use the middle button, or switch explicitly in pan mode via the
panbutton.
You can also use the touchpad, or the dedicated buttons/menus, but it is less flexible.
When you are zooming, Aladin will load automatically the pixels covering your current view according to your current zoom factor. The stack plane associated to the all sky survey shows a control ball helping you to know the state of this process:
- blinking green/white ball
 :
Aladin is still downloading additional data;
:
Aladin is still downloading additional data; - orange ball
 :
the display is ready, but there is (not loaded yet) better resolution data for this region;
:
the display is ready, but there is (not loaded yet) better resolution data for this region; - green ball
 :
the display is ready with data at the best available resolution for this region;
:
the display is ready with data at the best available resolution for this region; - dark orange ball
 :
catalogue loading was aborted by user;
:
catalogue loading was aborted by user; - red ball
 :
there is a problem (server error, ...);
:
there is a problem (server error, ...); - red cross on ball
 :
no data found for this region.
:
no data found for this region.
What is the small bar displayed under the HiPS name in the stack?
This small bar concerns only the HiPS catalogues.

Aladin stack element for the Gaia EDR3 HiPS catalogue: the green/orange bar represents the fraction of sources displayed in the current field of view.
It represents the proportion of sources displayed in the current field (green part) compared to sources present in this field, but not displayed yet (orange part). The more you zoom in the field, the more the green part is growing. When the progress bar is fully green you are sure that you have and see all sources in the field.
Can I change the density of a HiPS catalog?
Yes you can!
Use the dens. slider at the bottom of the stack for adjusting the
density of a HiPS catalog without modifying the zoom factor. Take care
that a heavy density can be easily reached requiring a lot of resources
and time.
If you do not see this density slider in your stack, activate it via your preferences (
Edit -> User preferences -> Control sliders).
Can I modify the HiPS projection?
By default Aladin uses a AITOFF projection to display a progressive
survey, but you can also display it in SIN (spherical) or any other
projections supported by Aladin (sinus, tangential, aitoff, zenithal equal
area, stereographic, cartesian, mollweide,...) -> For that, use the
projection selector  on the top right side. You can also modify the
projection via the "Properties" associated to each plane. In this last
case, only the concerned plane will modify its projection, the other
planes will keep the global projection.
on the top right side. You can also modify the
projection via the "Properties" associated to each plane. In this last
case, only the concerned plane will modify its projection, the other
planes will keep the global projection.
You can also modify permanently the default projection via your preferences (
Edit -> User preferences... -> HiPS projection).
Can I display images over a HiPS?
Yes you can, even an HiPS over another HiPS. Use the small slider at the bottom of the plane logo (in the stack) for adjusting the transparency.
HiPS and regular images can have transparent pixels (BLANK, NaN or image
borders) allowing you to see simultaneously several "pixel" planes
without adjusting the opacity slider. The order of the display follows
the order in the stack. This facility is available for FITS and PNG
coding, but it is not supported for JPEG images/HiPS as JPEG does not
have a transparency channel.
Can I get the true pixel values in a HiPS?
Yes you can, but only for HiPS surveys providing them.
Aladin HiPS display has two modes:
- a fast
Previewmode (the individual HiPS tiles are in JPEG or PNG format); - and a
Full dynamicrange mode (the individual HiPS tiles are in FITS format).
For good performances, the remote progressive surveys are generally
distributed in 8 bits pixels in JPEG or PNG format (color or gray
levels). But you can switch from JPEG/PNG format to FITS format (use the
pixel panel via the corresponding button
![]() or the
or the hdr button
![]() on the
bottom-left side of the main panel, or menu
on the
bottom-left side of the main panel, or menu Image -> Pixel contrast & map...).
You get the same progressive
survey, but in true pixel mode.
The FITS mode is inevitably slower (files are 10 to 40 times larger), but remember that the files are duplicated in a local cache on your disk. So the next time you view the same region, it will be faster.
Note that the FITS mode allows you to adjust as you need the contrast. In JPEG or PNG mode, the pixel dynamics has been computed in advance with 256 levels (8-bits).
How does the Aladin progressive mode work?
Since release v7, Aladin provides a progressive display mode for sky surveys or wide images with the capability to zoom and pan on any region (see below). This mode is called HiPS for Hierarchical Progressive Survey. It is based on a HEALPix tesselation scheme. According to the HEALPix principle, the sky is divided in 12 equal-area rhombs. Each rhomb can be divided in 4 sub-rhombs recursively until reaching the maximal survey resolution. Libraries and documentation on HEALPix can be found at this address : http://healpix.sourceforge.io. Aladin uses this hierarchical division to gain speed and only load the rhombs that cover the current user view.
Internally, Aladin is splitting the survey in a hierarchy of directories storing all the HEALPix rhombs. The structure is quite simple. In order to avoid too many files, Aladin manages HEALPix surveys via 512x512 pixels tiles. Each tile is stored in a separated file, labeled by its HEALPix index number (either in FITS for true pixel value access and/or in JPEG/PNG). The hierarchy deeply depends on the maximal survey angular resolution. Presently, the best angular resolution supported by Aladin is 0.0004" (NSIDE=536870912, i.e. 12 * 220 * 220 tiles of 512 * 512 pixels).
       /Norder3
          +Dir0
            + Npix0.fits
            + Npix1.fits
            +...
            + Npix767.fits
       ...
       /Norder11
          +Dir0
          +Dir10000
          +...
When the progressive survey is loaded from an http server, in order to
increase the display speed, these HEALPix hierarchies are duplicated in
a user cache directory ($HOME/.aladin/Cache/) following the same
directory structure.
Since 2017, HiPS is an IVOA recommended standard.
How does Aladin choose the good HiPS server?
A HiPS survey is generally duplicated on several mirror sites over the
world. When you load a HiPS, Aladin will test the speediness of each of
them and select the best one according to your localization. This test
will be redone each time you change your localization, or if the last
test is outdated. This selection can also be temporarily modified via the
properties of the HiPS plane (prop button ![]() ).
).
In case of network failure between your localization and the current HiPS server, Aladin will silently switch to another one.
Is Aladin supporting HEALPix maps?
Yes it is!
Aladin is able to load standard HEALPix maps stored in a FITS file (in
fact a FITS binary table), in RING or NESTED scheme, and/or in partial
mode (whenever a subpart of the sky only is described). This mode is
notably adapted for low resolution surveys (typically file < 1Gbyte).
Good examples of HEALPix fits maps can be loaded from the LAMBDA site. For instance cut and paste in Aladin this WMAP map http://lambda.gsfc.nasa.gov/data/map/dr4/skymaps/7yr/raw/wmap_band_iqumap_r9_7yr_K_v4.fits (96Mbyte)
For deeper surveys (>1Gbyte), Aladin uses its own HEALPix structure based on a hierarchy of directories and files (see How does the Aladin progressive mode work).
Why Aladin does not load my partial HEALPix map?
Presently, for loading a partial HEALPix map, Aladin requires the memory corresponding to the full HEALPix sky map at the same resolution. Concretely, you are limited to HEALPix sky map with low resolution even in partial mode.
Tip: One solution is to convert your HEALPix map in HiPS before usage thanks to this command:
java -jar Aladin.jar -hipsgen in=yourHealpixMap.fits creator_did=XXX/test out=YourHips
Is Aladin supporting HEALPix cube maps?
Yes and no!
As described here, Aladin is able to load standard HEALPix maps stored in a FITS file. This FITS file can contain several extensions, for instance an extension for the intensity all-sky map, another extension for the all-sky map containing the number of observations at each location... In this case Aladin allows the user to create one all sky view per extension (via the Properties of the plane in the stack). But it is not really a display of an all-sky cube (as a movie).
I've heard that Aladin can draw polarisation data?
Yes it can.
As described below, Aladin is able to load standard HEALPix maps stored in a FITS file. This format supports extensions that describe Q and U polarisation parameters for each pixel. When Aladin finds this information, it allows the user to create:
- a polarisation overlay plane displaying polarisation segments over each pixel. The density, size and thickness of these segments can be controlled via the Properties panel associated to the polarisation stack plane;
- a false color view based on polarisation angles;
- a false color view based on polarisation intensities.
Good examples of HEALPix fits maps containing polarisation data can be loaded from the LAMBDA site. For instance cut and paste in Aladin this WMAP map http://lambda.gsfc.nasa.gov/data/map/dr4/skymaps/7yr/raw/wmap_band_iqumap_r9_7yr_K_v4.fits (96Mbyte)
Can I crop an image from a HiPS?
Yes you can. You have two options, either client side or server side:
Client side:
Via the menu Image -> Crop image area... (or directly via the crop
button ![]() ) you activate the
) you activate the crop tool.
Select the region by clicking and
dragging the red control rectangle, and confirm your choice. You can
directly edit the size of your target image by double clicking the small
numbers.
When your background survey is displayed in preview mode (JPEG|PNG), the resulting image will be a simple "screen dump", with a simple astrometric calibration. But when your background survey uses the FITS mode, the resulting image will be produced by a resampling algorithm from the original HEALPix pixels to the resulting FITS image. It's better but slower. The resampling algorithm is based on the bilinear approximation method.
The client side method implies that all HiPS tiles required for cropping will be downloaded first before performing the cropping operation. It can take a long time especially for FITS mode.
Server side:
You can also ask the HiPS server to crop for you and send the resulting
image to Aladin. It is definitively more efficient but is only possible
for HiPS available on the CDS HiPS servers (most HiPS are available on
the CDS HiPS servers). This functionality is available from the
dedicated Hips2fits form displayed via the File -> Open server selector... -> Aladin Hips2fits menu.
Note that this Hips2fits server-side service can be used directly from a Web page or from a URL API: https://alasky.cds.unistra.fr/hips-image-services/hips2fits
Can I create my own HiPS?
Yes you can!
Aladin allows you to create your own HiPS (Hierarchical Progressive Survey) from a set of FITS or JPEG|PNG images. The goal is to prepare yourself a hierarchy of HEALPix tiles that Aladin will be able to display.
You can use the menu Tool -> Generate a HiPS based on... and follow the
instructions.
But as this process can take a while (10 hours for one band of the DSS
survey), it is possible to do the same thing via a command line using
Aladin -hipsgen parameter. In this case, the Aladin graphical
interface won't be activated (and no XDisplay is required).
The simplest hipsgen command is:
java -Xmx2g -jar Aladin.jar -hipsgen in=Path creator_did=my/test/id
Once you have generated the HiPS, it's possible to use it locally, or to offer your data to your collaborators, or even to the whole Aladin community, just by exposing these files via a HTTP server. A simple access to target path URL is enough for accessing to your HiPS survey.
For detailed instructions, have a look at this document: https://aladin.cds.unistra.fr/hips/HipsIn10Steps.gml
Is it possible to create a colored HiPS?
Yes it is! You have two possibilities.
Your original images are in colored JPEG or PNG, with associated
astrometric calibration (via .hhh file
or inside the JPEG|PNG
comment). In this case you proceed as for FITS original images with the
additional parameter color=... (see this section).
Alternatively your original surveys are provided in two or three bands
and you want to combine them in an progressive colored survey. In this
case, you generate first separately the 3 HiPS, one per band (see
this section). And after that, you open the Generate RGB tab of the tool
Tool -> Generate a HiPS based on... -> An image collection and follow the
instructions.
Which method is used for generating HiPS colored?
HiPS color generation uses the classic method or a modified Lupton
method. In both cases, each colored pixel is generated from the red,
green and blue values calculated from the 3 original HiPS. In the
classical method, each color component is mapped into a byte (256
possible values) based on a minimum cut value, a middle cut value and a
maximum cut value plus a transfer function. In the modified Lupton
method, each color component is calculated on the basis of the algorithm
described in
2004PASP..116..133L
but modified to avoid artifacts on the saturated regions (same choice as
the Astropy library). Concretely the modified Lupton method applied in
Aladin uses 7 parameters (scaleR, scaleG, scaleB, minR, minG, minB and
Q) with this algorithm:
   r = r * scaleR + minR         g = g * scaleG + minG         b = b * scaleB + minB
   r = max(0,r)                  g = max(0,g)                  b = max(0,b)
   I = (r+g+b)/3.
   fI = arcsinh(Q * I) / sqrt(Q)
   I = max(1e-6,I)
   r = fI * r / I                g = fI * g / I                b = fI * b / I
The classic method provides beautiful colorful compositions, especially
with digitized images or images with low pixel dynamics. In contrast,
the Lupton method is suitable for CCD images with very high pixel
dynamics. Its specificity is to increase the original color distances
(blue stars are bluer, red stars are redder). Make sure that the
original values must be mapped in a positive range using the factors
scale and min. The factor Q impacts the behavior of the
transfer function applied in the Lupton method (arcsinh / sqrt)
Can I create a HiPS color by script?
Yes you can!
Aladin integrates a HiPSgen library which allows you to generate HiPS
colored as a combination of 2 or 3 previous HiPS.
Launch this command for details: java -jar Aladin.jar -hipsgen -h
What's the best choice: FITS, JPEG or PNG tiles?
The HiPS generation can be done simultaneously in true value tiles or in compressed tiles. In the first case, the HiPS tiles are coded in FITS keeping all the pixel dynamics. In the second case, the tiles can be coded in JPEG or in PNG. In both JPEG or PNG cases, a pixel cut must be applied (keeping 256 gray levels).
JPEG solution is faster than PNG (faster during the compression/decompression phases, and faster because the tiles are smaller (about 4x)). However JPEG can create some artifacts, notably at the borders of the observations. And JPEG can not manage translucent pixels.
So, if you have a full sky survey, choose JPEG. Otherwise, for pointing observations or partial surveys, prefer PNG. And, if your users do not need to have an access to the true pixel values (no scientific context), you have the possibility to remove the FITS tiles before publishing your HiPS.
How to distribute my own HiPS?
In order to distribute a progressive survey that you generated (see Can I create my own progressive survey), you have just to expose the HiPS behind an HTTP server. No database system nor dedicated CGI are required, only files.
In this context, it is recommended to also generate the JPEG or PNG
tiles for efficient remote access. The users will have the choice to
switch from fast Preview access to FITS
true pixel value (but slower)
mode.
Can I control the access to my survey?
If your survey is exposed behind a protected web server (by password), at the first access of your survey, Aladin will ask to the user the name/password parameters according to the HTTP standard (basic protection).
The click & drag function does not move the sky as I want it to!
In spherical projection (sinus), when you pan the sky, the sphere rotation is done around the poles. If you display a HiPS and you want to move through the galactic plane, it will be difficult if your reference frame is equatorial (ICRS for instance). Switch to GAL the current reference frame, or display the coordinate grid for visualizing easily the equator plane.
Tip: You can set the default system frame via the user preferences (menu
Edit -> User preferences...).
Can I display the survey in galactic system, and get the coordinates in equatorial system?
Yes you can! Use the "Properties" panel associated to the survey for dissociating the survey frame and the coordinate frame.
Can I move to a specific HEALPix pixel number?
Yes you can!
In the location field, type the HEALPix pixel number (NESTED notation)
prefixed by the HEALPix order (NSIDE = 2order) - use / as
separator.
For instance, 3/755 will move the reticle to the center of the
HEALPix pixel number 755 at the NSIDE 23, i.e. 315.0 -24.625 GAL.
Can I display an HEALPix grid?
Yes you can!
Aladin supports both coordinate grid and HEALPix grid. Select HEALPix
grid in the corresponding menu (Overlay -> HEALPix grid or Alt+W).
It seems that the progressive mode requires more memory!
This is true. You need a minimum of 64Mbyte for running Aladin in progressive mode, but in practice 256Mbyte is more appropriate.
However, two functions require more memory:
- To load a HEALPix Fits map in
RINGordering: the RAM must contain the whole sky -> in practice, NSIDE 8192 inRINGis a limit (3.75Gbyte RAM required). There is no such constraint for HEALPix Fits maps inNESTEDordering. - for creating your HiPS from a large collection of FITS images: use as much memory as possible to speed up the process time.
Can I build a catalog HiPS myself?
Yes you can, but not with Aladin!
A catalog HiPS can be generated thanks to the package Hipsgen-cat provided here: https://aladin.cds.unistra.fr/hips
I cannot display my HEALPix map?
Aladin requires an HEALPix map with a NSIDE greater or equal to 8 and necessarily a power of 2.
Multi-Order Coverage map (MOC)
What is a Multi-Order Coverage map?
A Multi-Order Coverage map, also called MOC, is a method for describing and manipulating coverages: space coverage (SMOC), and/or time coverages (TMOC) or both (STMOC). Its goal is to be able to provide a very fast comparison mechanism between coverages.
The mechanism is based on the HEALPix sky tessellation algorithm. It is essentially a simple way to map regions of the sky into hierarchically grouped predefined cells. Concretely, a MOC is a list of HEALPix cell numbers, stored in a FITS binary table.
MOC has been invented by the CDS in 2008 and it has been endorsed by the IVOA in 2013. It is an international standard since 2014. The last version (May 2022) is available at this address: http://ivoa.net/documents/MOC/
Initially designed for space coverages only, MOC has been extended in 2019 for also supporting the time dimension as TMOC for Time-MOC and STMOC for Space-Time MOC. Technically, the time are coded as a discretization of the time dimension, but based on JD system (Julian days) instead of HEALPix.
Aladin has been using MOC since v10, but has been using it
intensively since v12, particularly in its temporal extension.
The Coverage menu offers a wide range of tools for manipulating this
digital object, allowing easy use of spatial and temporal coverage.
Where can I find MOCs?
All CDS data collections (Simbad and VizieR catalogs) and all HiPS are provided with their space MOC. In addition, some VO providers generate their collection MOCs. All of them are directly available thanks to the data discovery tree (Aladin v10 and following). The version v12 and following is also able to manipulate TMOC and STMOC (respectively time and space-time coverage) when available.
Why do I have to use MOC rather than other coverage method?
The operations on MOC are extremely simple and fast (generally a few
milliseconds) even for very complex sky regions or time coverages.
Thanks to the menu Coverage -> Logical operations..., Aladin
provides a set of MOC functions: union, intersection, subtraction,
difference, complement, very useful for manipulating coverages.
For instance, you can determine in a few mouse clicks the region observed by SDSS and HST, but for which there is no information in Simbad.
Can I convert a polygon, a circle, a STC-S region into a space MOC?
Yes you can!
Draw your polygons and your circles (manually or by script command),
select them, and use the menu Coverage -> Generate a spatial MOC based on... -> The selected drawing objects.
Can I convert a space MOC in polygons?
Yes you can but presently only in the Aladin beta version (-beta
parameter on the command line) and via the export script command.
You can save a MOC as a polygon (the perimeter of the MOC) via this
script command: export -ajs MOCPlane mypolygon.txt
Can I load several MOCs simultaneously?
Yes you can!
If you select several collections in the Data Discovery Tree, either by
a multiselection (Ctrl+mouse action) or by selecting branches rather
than leaves, the "Access selector" window will propose to load each MOCs, or
the unions of the MOCs, or the intersection of the MOCs.
Can I create a space MOC from my own images?
Yes you can!
If you have just one or two images, load them in Aladin and use the menu
Coverage -> Generate a spatial MOC based on... -> The current image, HEALPix map or HiPS....
For a large collection of images, it is preferable to use the action Coverage -> Generate a spatial MOC based on... -> An image collection... without loading the images
individually.
Can I create a MOC from my own tables?
Yes you can! For space, time, or space-time MOC.
If you can load your table in Aladin (< one million sources), use the
menu Coverage -> Generate spatial (resp. Temporal, Space-Time) MOC based on... -> the selected catalog.... If your table is larger, prefer to
use TOPCAT /
STILTS which can manipulate bigger tables. Another
alternative is the MOCpy library which
provides MOC support in Python language.
Which space MOC resolution do I have to use?
The space MOC resolution specifies the angular size of the smallest MOC
HEALPix cell. It is specified with an order number following this table:
Values of space MOC resolutions
Order
Resolution
0
58.63°
1
29.32°
2
14.66°
3
7.329°
4
3.665°
5
1.832°
6
54.97'
7
27.48'
8
13.74'
9
6.871'
10
3.435'
11
1.718'
12
51.53"
13
25.77"
14
12.88"
15
6.442"
16
3.221"
17
1.61"
18
805.2mas
19
402.6mas
20
201.3mas
21
100.6mas
22
50.32mas
23
25.16mas
24
12.58mas
25
6.291mas
26
3.145mas
27
1.573mas
28
786.3µas
29
393.2µas
Which time MOC resolution do I have to use?
The time MOC resolution specifies the time range of the smallest MOC time
cell. It is specified with a order number following this table:
Values of time MOC resolutions
Order
Resolution
Order
Resolution
0
73067yr 276d
31
17min 53s
1
36533yr 320d
32
8min 56s
2
18266yr 342d
33
4min 28s
3
9133yr 171d
34
2min 14s
4
4566yr 268d
35
1min 7s
5
2283yr 134d
36
33s 554ms
6
1141yr 249d
37
16s 777ms
7
570yr 307d
38
8s 388ms
8
285yr 153d
39
4s 194ms
9
142yr 259d
40
2s 97ms
10
71yr 129d
41
1s 48ms
11
35yr 247d
42
524ms 288µs
12
17yr 306d
43
262ms 144µs
13
8yr 335d
44
131ms 72µs
14
4yr 167d
45
65ms 536µs
15
2yr 83d
46
32ms 768µs
16
1yr 41d
47
16ms 384µs
17
203d 14h
48
8ms 192µs
18
101d 19h
49
4ms 96µs
19
50d 21h
50
2ms 48µs
20
25d 10h
51
1ms 24µs
21
12d 17h
52
512µs
22
6d 8h
53
256µs
23
3d 4h
54
128µs
24
1d 14h
55
64µs
25
19h 5min
56
32µs
26
9h 32min
57
16µs
27
4h 46min
58
8µs
28
2h 23min
59
4µs
29
1h 11min
60
2µs
30
35min 47s
61
1µs
The choice of the resolution depends on the purpose, but generally an order between 16 and 36 is a good compromise between precision and compactness.
Why does Aladin change the MOC precision when I zoom?
Aladin draws a MOC as a list of cells. As a MOC can contain a lot of cells, for keeping good drawing performances, Aladin decreases the MOC precision when it has to draw it over a large part of the sky (resp. time). It is just a visual effect. The measurements and operations on the MOC is always done with the original MOC resolution.
This Aladin MOC display method is also useful to find easily small observations on the sky or in time plot, too small to find it at the true MOC resolution.
You can modify the visual MOC resolution via the
dens.slider under the stack.
Is it possible to create at space MOC from a polygon?
Yes you can.
Draw a polygon via the tool draw ![]() without forgetting to close it by
clicking on the first control point. Then, select the menu
without forgetting to close it by
clicking on the first control point. Then, select the menu Coverage -> Generate a spatial MOC based on... -> The selected drawing objects.
Is it possible to query data bases by regions or space MOC?
Yes, it is! But only on servers which are supporting this kind of queries, notably all CDS services.
Draw a polygon, or a circle, or load a space MOC. Select it in the view,
or in the stack. And select the collection that you want to query with
this region in the Data Discovery Tree. After that, select the query by region & MOC.
Notice that these queries by MOC are extremely fast and powerful, even with very complex sky regions.
Script mode and macros
What is the script mode?
Aladin experienced users have access to a possibility to control Aladin: the script mode or command line mode.
This control mode can be used via:
-
a console window (menu
Tool -> Script console, orF5) prompting each command; -
the execCommand() method of the VOApp Java interface (see VOApp section). By this way, any collaborative Java applications and notably any Aladin compatible plugins can control Aladin;
-
the standard input : you can use it by redirecting a script file or the standard output of another program (see the PERL example below). In this case, you can use the
-noguiparameter on the command line hiding the graphic interface; -
SAMP VO standard. In this case, you can use the
script.aladin.sendmessage, taking the command to be sent as an argument.
Tip: You can also pass any script command in the
Commandfield on the top of the main Aladin window.
Click here for the list of script commands
      PLANE:                                   VIEW:
     get servers [target] [radius]           mview [1|2|4|9|16] [n]
     load filename                           cview [-plot] [[x] v]
     select x1 [x2..]                        select v1 [v2..]
     set [x1] [x2..] prop=value              zoom ...
     hide|show [x1] [x2..]                   northup|unnorthup [v1] [v2..]
     mv|copy x1 x2                           thumbnail [radius]
     rm [x1] [x2..] | -all                   lock|unlock [v1] [v2..]
     export [-fmt] x filename                match [-scale] [v|x|off]
                                             mv|copy v1 v2
      IMAGE:                                     rm [v1] [v2..] | -lock
     cm [x1|v1...] [colorMap...]             save [-fmt] [-lk] [WxH] [file]
     RGB|RGBdiff [x1|v1...]                  coord|object
     blink|mosaic [x1] [x2...]               timerange|time
     + | - | * | / ...
     norm [-cut] [x]                       CATALOG:
     conv [x] ...                            filter ...
     kernel ...                              addcol ...
     resamp x1 x2 ...                        xmatch x1 x2 [dist] ...
     crop [x|v] [[X,Y] WxH]                  ccat [-uniq] [x1...]
     flipflop [x|v] [V|H]                    search {expr|+|-}
     contour [nn] [nosmooth] [zoom]          tag|untag
     grey|bitpix [-cut] [x] BITPIX           select [-tag]
                                             browse [x]
      GRAPHIC TOOL:
     draw [color] fct(param)               FOLDER:
     grid [on|off]                           md [-localscope] [name]
     reticle [on|off]                        mv|rm [name]
     overlay [on|off]                        collapse|expand [name]


                                               COVERAGE:
                                             cmoc [-order=o] [x1|v1...]
      MISCELLANEOUS:
     backup filename     status       sync       demo [on|off|end]  pause [nn]
     help ...            trace        mem        info msg
     macro script param  call fct     list [fct] reset
     setconf prop=value  function ... = ...      convert      quit
The Aladin recent new commands are: timerange, time
The help for each command can be accessed via the help script command.
Example of Python script controlling Aladin:
#!/usr/bin/env python
import subprocess

p = subprocess.Popen(['java -jar Aladin.jar'],
                     shell=True,
                     stdin=subprocess.PIPE
                       )
p.stdin.write('grid on\n')
for obj in ('M1', 'M104', 'NGC2024'):
    p.stdin.write('reset; get aladin '+obj+'; get VizieR(GSC1.2); get simbad;\n')
    p.stdin.write('zoom 10arcmin;save '+obj+'.jpg\n')

p.stdin.write('quit\n')
p.wait()
Example of PERL script controlling Aladin: To create a view with GSC2.3 and Simbad overlayed on the default image of Aladin image server for 3 astronomical objects .
#!/usr/bin/perl
open(ALADIN,"| java -jar Aladin.jar");
print ALADIN "grid\n";
foreach $obj ("M1","M104","NGC2024") {
   print ALADIN "reset; get aladin $obj; get Vizier(GSC2.3); get simbad;\n";
   print ALADIN "zoom 10arcmin; reverse; save $obj.jpg\n";
}
print ALADIN "quit\n";
close ALADIN;
Other example by simple redirection:
To create a RGB image for M1 with three images coming from Aladin
server, STScI DSS server and ESO DSS server.
echo "get aladin(CDS/P/2MASS/J) M1 15';get DSS.STScI(POSS1_Red,15,15) M1;\
get DSS.ESO(POSS2UKSTU_Blue,15,15) M1;sync;rgb @1 @2 @3;save M1.png;quit"
| java -jar Aladin.jar -nogui
Where can I find documentation on script?
A short description of each command is available directly in
Aladin via the menu Help -> Help on script commands.... All these
command descriptions are also available in a reference manual at this
address : https://aladin.cds.unistra.fr/Java/AladinScriptManual.gml
Which script command do I have to use?
For discovering which command must be used for such or such action, the
easiest method is to do the action via the graphical interface, and have
a look in the console (menu Tool -> Script console...). The
corresponding script command should be echoed in the history.
How does the get script command work?
The get command is the most powerful script command in Aladin. Its
syntax is very flexible in order to cover all kind of servers and
protocols.
[PlaneName =] get ServerName(keyword,...) [Target [RadiusUnit]]
[PlaneName =] get ProtocolName(collectionID,...) [Target [RadiusUnit]]
-
PlaneNameThe name used in the Aladin stack (optional) -
ServerNamecan be any of server names shown in the Aladin's server frame (Aladin, Simbad, VizieR, NED, SkyView, SSS.cat, SSS.img, DSS.ESO, DSS.STScI, ..., or evenFovandFile) (the string case does not matter). Each server name can be followed by a keyword list in parentheses and separated by commas. Keywords with white spaces must be quoted. -
ProtocolName: Alternatively to theServerName, you can directly specify a protocol name (SIA,SSSA,CS,TAP,HiPS,MOC) supported by Aladin. In this case the first keyword must be thecollectionID: either the Aladin data tree leaf ID (ex:CDS/P/DSS2/color), or even the IVOA IVOID if it exists (ex:ivo://cxc.harvard.edu/cda/siap). -
Targetcan be a Simbad identifier or J2000 coordinates in sexagesimal syntax (with a space as the separator). -
Radiusmust be specified with the unit (deg,arcminor',arcsecor") without any blanks between the figure and the unit. The radius specification will be taken into account only for the servers which can manage it.
If the Radius is omitted, Aladin takes the most appropriate radius
according to the current view. If the Target is omitted, Aladin takes
into account the last specified target.
For a given server, the number and the order of the keywords don't
matter. Aladin tries to associate automatically the keywords with the
server query vocabulary. That gives a very simple general syntax for any
servers but it can have ambiguities if there is the same keyword for two
different things (ex: a scan machine called JPEG). In this case, it is
now possible to prefix the value by a parameter name (ex: survey=DSS).
The parameter name will be searched in the description of the parameter.
If there are several matched items, just one is returned (chosen by the server).
In this context, the available keywords evolved according to the evolution of the servers.
-
HiPS: allows you to load any HiPS image, cube or catalog survey. You can specify the HiPS/collection ID (ex:JAXA/P/ASCA_GIS) or the full HiPS name (with double quotes in case of spaces), or a portion of the HiPS name. You can also provide the keywordfits,jpegorpngfor specifying the tiles format. -
MOC: to query a MOC. The parameter must be a collection ID or an IVOID. The resulting coverage map will be displayed in the view. -
SIA: to query Simple Image Access IVOA services. The parameter must be a collection ID or an IVOID. The resulting image table will be drawn in the view, and the links to the images provided in the measurement panel. -
SSA: to query Simple Spectra Access IVOA services. The parameter must be a collection ID or an IVOID. The resulting spectra table will be drawn in the view, and the links to the spectra provided in the measurement panel. The access to the final spectra will require a SAMP spectra compatible tool (see the SAMP section). -
CS: to query Cone search IVOA services. The parameter must be a collection ID or an IVOID. The resulting source table will be drawn in the view and the associated values provided in the measurement panel. -
TAP: to query Table Access Protocol IVOA services. The first parameter must be a collection ID or an IVOID. The second parameter is the ADQL query (see the IVOA document for syntax details). The resulting table will be drawn in the view and the associated values (and possible links) provided in the measurement panel. -
VizieR: you can give catalogue names. You can also specifiy the dedicated keywordsallcolumnsandallskyto retrieve respectively all catalogue columns (and not only the default ones), and/or the whole catalog. -
File: you can specify a filename, or an URL. (see below) -
Other servers: any keyword displayed in the query form can be specified (e.g.
surveysfor SkyView)
A few examples:
-
get HiPS(CDS/P/DSS2/color) M51 30arcminLoad DSS HiPS colored around M51 with a field of 30arcmin.
-
get HiPS("HFI map 545Ghz",fits) 0 +0 180°Load PLANCK 545 HiPS centered in 0+0 in true pixel value mode (fits tiles).
-
get VizieR(USNOB,2MASS) HD1 20'Load USNOB and 2MASS catalogs from VizieR around HD1 with a 20 arcmin radius cone search.
-
get VizieR(logXMM,allsky)Load the XMM log for the whole sky from VizieR service.
-
get skyview(400,"60 micron",Sin) M31Load an IRIS 60 microns image from Skyview server (400x400 pixels, Sin projection).
-
Foo=get NED M101Load NED around M101, the result will be stored in the
Foostack plane. -
get HiPS(CDS/Simbad) M1Load HiPS Simbad catalog around M1.
-
get CS(ivo://org.gavo.dc/ppmx/res/ppmx/scs) M1Load PPMX catalog from GAVO server around M1.
-
get TAP(jvo/agn,"SELECT TOP 10 * FROM public.veron_2010")Load the 10 first sources of the Veron table from JVO server.
-
get MOC(ivo://xcatdb/P/XMM/PN/color)Load the MOC providing the coverage of all images in XMM PN survey.
-
get File(/home/perso/mydatafile)Load the local file
mydatafile. Aladin will automatically recognize its contents (image, catalog, cube, GLU record, HiPS properties...) and will display it accordingly. -
get Fov(HST) M1Load HST instrument field of view around M1.
Tip: By opening the
Propertiesof the generated plane, you can see the URL query. It is a good method for verifying your query interpretation.
Tip: You can learn a lot about the
getsyntax by opening the Aladin console (F5) and looking the generated echo commands.
Can I define a script function?
Yes you can!
A script function is a list of commands identified by a name. It can use
parameters (prefixed by $). A function is executed thanks to the
script command: call functionName(...).
A script function must follow this syntax:
    function functionName($param1,$param2,...) {
       command1
       command2 $param1
       ...
    }
Example:
    function loadDM($file) {
       load $file
       cm rainbow sqrt
       zoom 180deg
       grid on
    }
The predefined functions are listed by the list command. The detail
of one specific function *name* can be displayed by executing the list *name* command.
How do $TARGET and $RADIUS function parameters work?
An Aladin function can have parameters. These parameters are identified
by the prefix $. Two predefined parameters can also be used:
-
$TARGET: will be replaced by the current location; -
$RADIUS: will be replaced by the current view size;
Example: for loading a DSS QuickV fits image from STScI data provider corresponding to the current view:
 function loadDSS($TARGET,$RADIUS) {
    get STScI(QuickV) $TARGET $RADIUS
 }
I do not understand the -batch parameter for the call script command?
Each script command of a function called by the call command is executed
sequentially. But by default this sequence is managed by the script
Aladin runtime machine in autosync mode. This means that the stack
must be fully ready (no blinking ball) for launching a new script
command. This behaviour can be problematic if you have queried a very
slow server which will jam the runtime machine. And if you disable the
autosync mode (via sync off command), the runtime machine will
no longer wait the end of the previous command before launching the
next. For associated sequence of commands (see the example below), this
behavior is also problematic.
Thus, the -batch parameter forces the execution without waiting for the
stack "synchronization", but by only verifying that the previous
command, and only the previous command is ready.
For instance, this function should be launched in batch mode to run properly:
 function mybrowse($cat,$coo) {
    get Vizier($cat) $coo 50deg
    browse
 }

 call -batch mybrowse(gliese,hd1)
Note: The
-batchmode is notably recommended for collaborative tools controlling Aladin via the VOApp interface (see the corresponding section).
How to use a function as a bookmark?
A bookmark is just a function whose execution can be directly
launched by a button on the top of the main Aladin panel. The list of
bookmarks can be modified by the setconf bookmarks=... script
command.
For instance:
- For displaying bookmarks of Optical, DSS and MyFct functions:
setconf bookmarks=Optical,DSS,MyFct - For removing the
 DSS bookmark:
 setconf bookmarks=-DSS - For adding the
SDSS bookmark:
setconf bookmarks=+SDSS
Can I use macros in Aladin?
Yes you can!
The Macro tool (menu: Tool -> Macro controller...) allows you to write
(or load) an Aladin script which will be used for an object list. This
object list can be written by hand or loaded from a file.
It is a very simple and powerful tool for repeated actions.
In order to use macros, open the Macro controller window from the Tool
menu. This window is split into 3 parts :
- the top panel allows you to write the script to be executed.
Parameters should be written as
$1,$2, The script can also be loaded/saved from theFilemenu. - the middle panel allows you to type a list of parameters. First column
contains the set of values for parameter
$1, second column values for parameter$2, etc. This list can also be loaded/saved from theFilemenu, or even imported from a catalog plane (see menuFile). - the bottom panel is made of several buttons controlling the execution of the script.
Usage example:
Script :
reset
get aladin($1) $2
sync
get simbad
get vizier($3)
sync
contour 5
Parameters:
DSS1	hd2	USNO-B1
2MASS	hd2	UCAC2
DSS2	taurus	NOMAD
2MASS	taurus	GSC2.2
IRAS	ngc1333	Tycho
You can apply a macro on the list of sources already loaded in Aladin as a classical catalog. Use
Tool -> Macro controller... -> File -> Use selected plane sources as params.
Can I launch a macro via a script command?
Yes you can!
Aladin offers a new script command called macro which takes 2
parameters. The first one is the path of the macro, and the second one,
the path of the macro parameters.
Can I create thumbnail images from a target list?
Yes you can! You have two methods:
- by creating a list of views centered on the objects;
- via a script.
Thumbnails as a list of views
The simplest method is to use a progressive survey and to generate as many views as you have targets.
Suppose that you have generated a list of targets from our own table (see the associated FAQ entry).
-
Open a progressive survey, for example using the
DSSbookmark; -
Load the source list as a classical table (menu
File -> Load local file) -
Launch the creation of the views : menu
Tools -> Thumbnail view generator
Note that the new views are locked on target. You can change the
zoom factor, but not the center of each individual view. For removing
all the created views, choose one of these options: View -> Delete other views, or View -> Delete all the locked views.
Thumbnails via a script
Another method is to use a dedicated macro applied on a progressive survey.
Suppose that you have generated a list of targets from your own table (see the associated FAQ entry).
-
Open a progressive survey, for example using the
DSSbookmark; -
Open the macro controller (menu
Tool -> Macro controller...); -
Load the source list as a list of macro params (menu
File -> Use selected plane sources as params); -
Adapt the following macro:
$3; zoom 20arcmin; save $2.jpg; -
Launch the macro on the target list.
Is it possible to generate a contour for a specific value?
With the graphical interface, it is difficult but possible. Keep only one level and adjust it on the proper value!
With the contour script command, you can not. Maybe in a next
release.
Is it possible to pass a galactic position even if the default frame is equatorial?
Yes it is, since release v10.
You can specify a coordinate with the frame acronym as a suffix (GAL,
ECL, ICRS, FK5, FK4...). In this case the default coordinate frame is
ignored.
Example: 123.00 +56.5 GAL
Troubleshooting
The fonts and icons are really too small on my High DPI screen
Our computer screens are competing to offer ever finer resolution. These are called High DPI screens. On such screens, if you are using Aladin with an older version of Java (<10), Aladin's graphical interface will appear as is, without any specific processing. The consequence will be graphical elements (fonts, icons, menus, buttons, ...) that are far too small to be easily usable.
However, if you use a recent version of Java (>=10), the JVM automatically enlarges the graphical interface elements. The result is satisfactory but not always perfect, especially for certain graphical elements which will appear too large, blurred and/or distorted.
From Aladin release v12, it is also possible to precisely adjust the visual zoom factor via the user preferences (110%, 120%...), whatever the version of Java used. The visual result is much better with a specific choice because the enlargement processing is done directly by Aladin.
When I load Simbad as HiPS catalog, sometimes Aladin freezes
Indeed, an unfortunate bug had crept into v10 of Aladin. In the situation where you started Aladin by immediately creating a HiPS Simbad plan, while having activated the specific object display filter, it was possible to block Aladin, with no other possibility than to kill the process. This bug has been hopefully fixed in v12.
The resource tree remains almost empty, even if I restart!
With v10 or v11, if you abruptly interrupted Aladin at startup while it updated the resource tree ("updated..." displayed below the tree), the local backup could be corrupted. If your resource tree contains almost nothing, you will also have great difficulty using the program (no access to the HiPS colour DSS by default).
The method to get back to a stable state was to stop Aladin, delete
Aladin's tree local cache, i.e. delete the file
$HOME/.aladin/Cache/Multiprop.bin, and restart. Or better, move to
Aladin v12.
From v12 onward, altering the cache is no longer possible even with an unexpected interruption.
On MacOS the .dmg file is reported damaged or can't be opened
On some releases of Mac OS X, attempting to install the Aladin.dmg file apparently can result in the message:
Aladin is damaged and can't be opened, you should eject the disk image
or possibly (not so far reported, but looks like it might happen):
Aladin can't be opened because it is from an unidentified developer
It seems that this is security settings (a.k.a. GateKeeper) default to not letting you run anything from anywhere other than the Mac App Store or from signed applications. Unfortunately, this results in it reporting Java-based non-signed applications as damaged.
A basic method is to avoid installing Aladin as an application, and
launch it from a terminal. To do this, just download the
Aladin.tar file, unpack
it in the directory of your choice, then run Aladin by Ctrl+clicking the
Aladin launch script.
There are two other workaround methods, unfortunately quite dependent on the version of Mac OS you're using. One is to eliminate the quarantine flag for the file from the command line. If Aladin is in the current path, you can type
xattr -d com.apple.quarantine Aladin.app
Alternatively, you can (perhaps temporarily) change one of the security
settings by going to the Apple menu | System Preferences... | Personal section | Security & Privacy | General pane and
changing the setting Allow applications downloaded from: to Anywhere.
You can run Aladin, and a dialog will be shown telling you the
application is not signed. Once you accept it, you can revert, if you
want, your security settings to the default setting (Allow applications downloaded from: Mac App Store and identified developers). Here is a
more detailed
explanation
(for a different application, but you get the idea).
Thanks to the TOPCAT FAQ and Juan de Dios Santander Vela who reported these solutions.
Aladin remembers the size and position of its window when closing and starting. But it doesn't remember when it has been maximized!
You are right! This feature has been added in the release v12.
The outreach mode does not work?
Until v9, Aladin could be launched in undergraduated mode, with simplified menus and data collections. It is no longer the case since Aladin v10. The main reasons for this evolution are: the fact that outreach mode users often complained that some advanced features were not available in the outreach mode (!); the simplification of Aladin v10 interface (default DSS color survey, data discovery tree, ...).
I can't get SExtractor to work!
SExtractor is a well-known tool in the discipline, developed by E. Bertin, which allows the generation of a table of stars and objects present in a FITS image. Aladin provides an interface to use this tool remotely, either from images from institutional servers (e.g. Skyview) or from local images.
Before Aladin v12, it was not possible to use this feature for local images if your personal computer was located behind a firewall, or even a simple internet box. This limitation has been removed with the last Aladin release.
The pixel values for PanSTARRs are not correct!
The PanSTARRs survey images use a special, non-standard FITS coding.
Until Aladin v10, the computation of pixel values pointed under
the mouse did not take this specificity into account. Since v12,
Aladin detects the particular method used by the PanSTARRS survey
(presence of the keywords BOFFSET and BSOFTEN in the FITS header), both
for the individual images, and for the HiPS survey generated from the
individual images. The values displayed and the photometry computation
from these values are now consistent with those provided by the mission.
My sources are not displayed at their right positions!
If you see a constant offset of all your sources, it is generally a problem of astrometric calibration of the background image, or maybe in your table. Check it by loading an astrometric catalog such as Gaia.
If you detect an offset of some sources, the main reason is generally a problem related to the epoch for objects with large proper motions. Aladin uses the coordinates provided in the table as is, without applying an epoch correction even if the background image epoch is different from the one in your catalog.
If your sources are totally wrongly displayed, it is generally a problem
of a bad detection of coordinate columns (typically with CSV tables).
You can check and fix it via the menu Catalog -> Column information..., button
Coord. columns.
There is a significant discrepancy in the positions of the stars when I overlay my own image over a HiPS survey!
That's right, and especially if your image covers a wide field. The method for displaying a local image on top of a HiPS survey requires a fast display. Thus Aladin simply calculates the corresponding position of 3 corners of the image to be displayed, then performs an affine transform (a very fast linear process). On the other hand, this may introduce a larger shift the further away the exact solution is from the linear approximation. We hope to improve this feature in a future version of Aladin.
To get around this concern, swapping the two planes - i.e. superimposing the HiPS survey on the local image - will not cause any offset.
The coordinate grid displays incomprehensible curves!
This can indeed happen. The astrometric solution associated with some images, for example ZTF, uses polynomial factors to adjust the basic linear solution (PV factors) at the edges. These corrections are only valid within the image. However, they will give surprising results as soon as you move away from the image. This is an inherent problem with polynomial corrections, and there is no indication of how far outside the image the solution is reasonably valid.
You can avoid this phenomenon (outside the image) by choosing another, more classical astrometric solution, for example by first loading a background HiPS. Beware in this case, inside the image, the solution will be worse than the original.
What happened to the Aladin tab that allowed you to load DSS images?
The images available for Aladin come from various data centres, archives, etc. Until 2020, the CDS was effectively providing the original DSS images via a dedicated server. Since then, CDS has moved to a new, more convenient and intuitive format: HiPS (see the related section). The DSS survey is now accessible in a fast, global, hierarchical and even colourful way.
However, if your work explicitly requires access to the original DSS
FITS images, it is still possible to load them either from the STScI
server or from the ESO server, both accessible under the DSS tab
in the Server selector window (Ctrl+L).
I can not load my HEALPix map!
Aladin can load HEALPix maps stored in a FITS binary table (following the
HEALPix standard), both in RING or NESTED scheme. But there are a few
limitations:
- the
NORDERmust be a power of 2 - the
NORDERmust be greater or equal to 3 (NSIDE=8)
Aladin requires more RAM for loading an HEALPix map in
RINGscheme than inNESTEDscheme. In case of memory problem, prefer theNESTEDscheme.
I can not easily pan my progressive survey!
In progressive mode, when you pan the view, Aladin rotates the sky along
the equator of the current coordinate system. Typically, if you want to
"turn" along the Milky Way it is easier to select before the GAL
coordinate system instead of an equatorial one.
Aladin says out of memory error instead of loading images!
Aladin runs through a Java Virtual Machine and depends on its memory configuration. First of all, free the Aladin plane stack from the unused images/catalogues and try again. Then, if it doesn't work better, see the question on image size limit to have more details.
I cannot build the HiPS of my observations!
For building a HiPS (Hierarchical Progressive Survey), your observations must have an proper astrometric calibration. You can test one of your image by loading it in Aladin and check if the coordinate grid can be activated. If it is not the case, your image can not be used for building an HiPS.
Developer information
Can I get the source code?
Yes you can!
Aladin v12 represents 378.000 lines of code for 766 java classes developed by the CDS. It is distributed under a GNU GPL v3 license. Here the address for the last source package : https://aladin.cds.unistra.fr/Java/AladinSrc.jar
What is an Aladin compatible plugin?
Aladin can be extended by personal Java plugins. It means that you can easily write your own Java code for your purpose either for image manipulation or catalog manipulation. Aladin offers Java methods to access directly the internal Aladin data buffers allowing you to keep good performances and avoid data duplication in memory.
Have a look at the Aladin plugins Web page to see the list of public Aladin compatible plugins https://aladin.cds.unistra.fr/java/nph-aladin.pl?frame=plugRep.
To install a plugin, you will proceed in 2 steps:
-
Open the menu
Tool -> Plugins -> Plugin controller...; -
Download and copy the plugin class/jar file into your dedicated Aladin plugin directory (
$HOME/.aladin/Plugins- orC:\Users\YourNamefor Windows) and press theRe-loadbutton. or Drag&Drop the plugin class/jar file directly from your OS desktop (Windows) into the Aladin plugin list.
To execute a plugin:
-
Look for your plugin in the Aladin
Tool -> Pluginsmenu; -
Execute your plugin either by the
Tool -> Pluginsmenu, or by thePlugin controller...or by the corresponding script command.
How to create my Aladin plugin?
Before creating your own plugin, look at Aladin plugin Web page to see the list of public Aladin compatible plugins to be sure that your plugin has not been written yet by another developer. If not, you have several tutorial examples here.
First of all, a simple example:
import cds.aladin.*;

public class Rotate extends AladinPlugin {

   public String menu() { return "Image rotation"; }
   public String description() { return "This plugin rotates the image"; }
   /*
    * Execute an 90deg image rotation
    * 1) get the pixels and image size
    * 2) create a new pixel array width=>height and height=>width
    * 3) rotate the image from the previous array to the new one
    * 4) send the new pixel array to Aladin
    */
   public void exec() {
      try {
         AladinData sd = aladin.getAladinImage();
         double [][] pix = sd.getPixels();
         int w = sd.getWidth();
         int h = sd.getHeight();
         double [][] rotpix = new double[h][w];
         for( int y=0; y<h; y++) {
            for( int x=0; x<w; x++ ) rotpix[y][w-x-1] = pix[x][y];
         }
         sd.setPixels(rotpix);
      } catch( AladinException e ) { e.printStackTrace(); }
   }
}
Create your plugin:
-
Basic usage:
- Create your plugin by extending the
AladinPlugin
Java class. (
Aladin.jarfile should be present in yourCLASSPATHfor the Java compilation, ex:javac -classpath Aladin.jar YourPlug.Java) - Use AladinData and Obj Java classes for directly accessing and manipulating the Aladin data (image pixels, catalog objects...)
- Create your plugin by extending the
AladinPlugin
Java class. (
-
Advanced usage:
Where can I find Aladin plugins?
All public plugins are available on Aladin plugin Web page.
Call for plugins: the Aladin team would be pleased to share your public plugins with the astronomical community: just send it to us.
Can I use Aladin behind my Web server as a CGI tool?
Yes you can.
Aladin can be interfaced to a CGI script to produce images on the fly.
You have to take care of this issue : on Unix, Aladin requires a X11 display and this display does not exist in this CGI context. However there is a very useful tool called Xvfb simulating an X11 display. So you just have to launch it before Aladin (if it is already running, it will stop launching).
Here is a CGI PERL script example creating on the fly a field chart (DSS + USNOB1 + Simbad) around the user's object. Feel free to adapt and use it for your own purpose.
Click to see the PERL code.
#!/usr/bin/perl
#
# Name  : AladinChart
# Author: P.Fernique [CDS] - june 2012
#
# CGI PERL script to produce on the fly Aladin field charts
# 1) Install it on your Web server CGI directory
# 2) Adjust the path section (and install Xvfb and cjpeg if you have not)
# 3) Try it with the URL http://your.web.server/cgi-bin/AladinChart?M101
# 4) Do not forget the credit mention somewhere ("generated by Aladin from CDS")

#The astronomical user object from HTTP parameter line
$o = $ENV{'QUERY_STRING'};

#HTTP decoding (if you prefer, use a standard lib)
$o=~s/\+/ /g;
$o=~s/%([0-9A-F]{2})/pack('C',hex($1))/eig;

#The paths (adjust them according to your configuration)
$java   = "/usr/bin/java";
$jar    = "/usr/local/Aladin/Aladin.jar";
$xvfb   = "/usr/X11R6/bin/Xvfb";
$fonts  = "/usr/X11R6/lib/X11/fonts/misc/";
$tmp    = "/tmp/tmp$$.jpg";

#The Aladin script to produce the field chart and save it
#You can modify it to produce any kind of charts
$script = "get STScI(DSS1) $o;get VizieR(USNOB1) $o;get Simbad $o;".
          "grid on;save $tmp1;quit";

#Command definitions
$output = "> /dev/null 2> /dev/null";
$aladin = "$java -jar $jar -script $output";
$Xdisp  = "$xvfb :1 -screen 0 1152x900x8 -fp $fonts -ac -pn $output &";
$exec   = "DISPLAY=localhost:1.0;export DISPLAY;echo '$script' | $aladin";

#debugging output line (uncomment them to fix possible problems)
#print "Content-type: text/plain\n\n$Xdisp\n$exec\n";
#exit(0);

#Command execution
system($Xdisp);
system($exec);

#Image transmission
if( !open(IMAGE,$tmp) || (stat(IMAGE))[7]==0 ) {
   print "Content-type: text/html\n\nError !!!";
} else {
   $size = (stat(IMAGE))[7];
   print "Content-type: image/jpeg\n\n";
   read(IMAGE,$buf,$size);
   print $buf;
   close(IMAGE);
}

#
unlink $tmp;
Can I control Aladin from IDL (Interactive Data Language)?
Yes, you can (requires IDL>=6.0)! The
idl_aladin_interface.tar.gz archive
contains a set of IDL functions (.pro files) allowing to launch Aladin,
load images, load tables, select object in tables, etc. Those functions
make use of the IDL Java Bridge to call Aladin Java methods from IDL.
Uncompress the archive (tar zxvf idl_aladin_interface.tar.gz), and
have a look at the README.txt file in directory idl_aladin_interface
to learn how to setup IDL in order to use this API.
Can I launch Aladin from another Java application?
For Java developers, Aladin can be launched from another Java
application. You have to use the Aladin.launch() static method with
these following optional parameters: (String CmdLineParams).
Example:
public class MyApp() {

   public void startAladin() {
      Aladin.launch("-trace");
   }
}
See the section VOApp for controlling Aladin from your own applet/application.
What is the Aladin cds.tools.VOApp Java interface?
For Java developers Aladin can control (and be controlled by) another Java application such as APT (NASA), GuideCam (ESO), CASSIS (IRAP)... To do that, we created a Java interface defining the possible interactions between Aladin and another Java tool. This interface is implemented by Aladin and has to be implemented also by the other application. The interactions between both applications are symmetrical.
Click to see the java code.
package cds.tools;
import Java.io.*;
public abstract interface VOApp {

/** To load a VOTable to another application
 * @param in VOTable stream
 * @param dataset label, or null
 */
public abstract String putVOTable(InputStream in,String label);

 /**
 * Allow an "external" application to send new data via an InputStream
 * in VOTable format. The reference to this "external" application has to
 * passed in order to eventually calls back the "external" application,
 * or to be called again by the "external" application concerning the
 * VOTable objects that it had sent before (see showVOTableObject() and
 * selectVOTableObject() methods below)
 * For this calls or callbacks, the "external" application has to
 * create a new VOTable column giving an unique identifier for each object
 * that it has sent. This column has to be described by the following
 * VOTable FIELD tag : <FIELD name="_OID" type="hidden">. It is strongly
 * recommended to add an unambiguous prefix to avoid conflicts with the
 * assignations done by the "external" application and its own assignations.
 * The unicity has to be maintained during all the session. It means that
 * successive VOTables must have difference unique identifiers.
 * @param app "external" application compliant with VOApp Java interface
 * @param in VOTable stream
 * @param dataset label, or null
 * @return an unique ID for this dataset (application dependent - for instance,
 *         the plane name in Aladin)
 */
public abstract String putVOTable(VOApp app, InputStream in,String label);

/** To get a dataset in VOTable format (typically for catalogues).
 * @param dataID the dataset identifier (application dependent
 * for instance, the plane name in Aladin)
 * @return a stream containing the VOTable
 */
public abstract InputStream getVOTable(String dataID);

/** To load an image to another application
 * @param in FITS stream
 * @param dataset label, or null
 */
public abstract String putFITS(InputStream in,String label);

/** To get a dataset in FITS format (typically for images)
 * @param dataID the dataset identifier (application dependent
 * for instance, the plane name in Aladin)
 * @return a stream containing the FITS
 */
public abstract InputStream getFITS(String dataID);


/**
 * Call or Callback asking the other application to SHOW objects found
 * in a VOTable previous transmission via loadVOTable() method.
 * The action "SHOW" is a choice of the other application (for example a blink)
 * @param oid list of identifiers found in VOTables (see comment of the
 *            putVOTable() method.
 */
public abstract void showVOTableObject(String oid[]);

/**
 * Call or Callback asking the other  application to SELECT objects found
 * in a VOTable previous transmission via loadVOTable() method.
 * The action "SELECT" is a choice of the other application (for example select
 * objects by showing the corresponding measurements, it can be the same thing
 * that the "SHOW" action - see showVOTableObject() method.)
 * @param oid list of identifiers found in VOTables (see comment of the
 *            putVOTable() method.
 */
public abstract void selectVOTableObject(String oid[]);

/**
 * Allow an "external" application to show or hide this application
 */
public abstract void setVisible(boolean flag);

/**
 * Allow an "external" application to control by script this application
 * @param cmd script command depending on this application
 * @return error or messages, can be null
 */

public abstract String execCommand(String cmd);

/** To register an observer of VO events implementing VOObserver interface.
 * see VOObserver.position() and VOObserver.pixel() associated callback methods
 * ex: addObserver(this,VOApp.POSITION|VOApp.PIXEL)
 * @param app the application to register
 * @param eventMasq a bit field (use POSITION or PIXEL),
 *                  (0 to remove the observer)
 */
public abstract void addObserver(VOObserver app,int eventMasq);
}
As historically Aladin existed as a standalone Java application and an applet, you have to instantiate Aladin by following the example below (and not by Aladin constructor):
Example of VOApp usage
Click to see an example of VOApp usage.
import cds.tools.*;
import Java.io.*;

public class mytool implements VOApp {

public void startAladin() {
   // Instantiate Aladin
   VOApp aladin = cds.aladin.Aladin.launch();

   // Ask Aladin to load a FITS image
   InputStream in = (InputStream)(new FileInputStream("FITSFile.fits"));
   aladin.putFITS(in,"MyFITS");

   // Ask Aladin to load a VOTable file (you pass your own object reference
   // for possible callbacks. You can use the simpler method putVOTable(in,"MyVOTable")
   // if you do not want to be called back for showing or selecting objects
   // of this VOTable)
   in = (InputStream)(new FileInputStream("VOTableFile.xml"));
   aladin.putVOTable(this,in,"MyVOTable");

   // Ask Aladin to select the VOTable objects identified by OID=78 and 82
   // See comment of the putVOTable() method for object identifier method
   aladin.selectVOTableObject(new String[]{"78","82"}
}

// You own implementation of VOApp methods for Aladin callbacks
public String putVOTable(VOApp app, InputStream in,String label) { return null; }
public String putVOTable(InputStream in,String label) { return null; }
public InputStream getVOTable(String dataID) { return null; }
public String putFITS(InputStream in,String label) { return null; }
public InputStream getFITS(String dataID) { return null; }
public void showVOTableObject(String oid[]) {
   System.out.print("I have to show:");
   for( int i=0; i<oid.length; i++ ) System.out.print(" "+oid[i]);
   System.out.println();
}
public void selectVOTableObject(String oid[]) {
   System.out.print("I have to select:");
   for( int i=0; i<oid.length; i++ ) System.out.print(" "+oid[i]);
   System.out.println();
}
public void setVisible(boolean flag) {}
public String execCommand(String cmd) { return null; }
public void addObserver(VOObserver app,int eventMasq) {}
}
What is the Aladin cds.tools.VOObserver Java interface?
For Java developers Aladin can interact with another Java application in
order to transmit it the current sky coordinates, the pixel value
corresponding to the current Aladin mouse position, or other events,
The collaborative Java application has to implement the following
VOObserver Java interface.
Click to see the java code.
package cds.tools;
import Java.io.*;
public abstract interface VOObserver {

/** The observer method to call on a position VO event
 * in order to transmit the current coordinates J2000 position.
 * Generally called by a Java mouse event, it is strongly recommended
 * to implemented this method as short as possible.
 * @param raJ2000 Right ascension in degrees J2000
 * @param deJ2000 Declination in degrees J2000
 */
public abstract void position(double raJ2000,double deJ2000);

/** The observer method to call on a pixel VO event
 * in order to transmit the current pixel value
 * Generally called by a Java mouse event, it is strongly recommended
 * to implemented this method as short as possible.
 * @param pixValue pixel value under the mouse
 */
public abstract void pixel(double pixValue);
}
As historically Aladin existed as a standalone Java application and an applet, you have to instantiate Aladin by following the example below (and not by Aladin constructor):
Click to see an example of VOObserver usage.
import cds.tools.*;
import Java.io.*;

    public class mytool implements VOObserver {

public void startAladin() {
   // Instantiate Aladin
   VOApp aladin = cds.aladin.Aladin.launch();

   // Register me for Position and Pixel events
   aladin.addObserver(this,VOApp.POSITION | VOApp.PIXEL);
}

// VOObserver callback method for coordinate positions
public void position(double raJ2000,double deJ2000){
   System.out.println("The current Aladin coordinates are: "+raJ2000+" "+deJ2000);
}

// VOObserver callback method for pixel value
public void pixel(double pixValue) {
   System.out.println("The current Aladin pixel value is: "+pixValue);
    }
}
From Aladin v12, three new events can be observed:
- Any mouse click ->
VOApp.MOUSEEVENT - Any change in stack status =>
VOApp.STACKEVENT - Any change in the area or position of photometric elements
(polygons, circles, spectrum mark) ->
VOApp.MEASURE
Aladin will call the execCommand(String) method of the
VOApp observer
interface on any of its events.
Where can I get an Aladin icon for links?
Various formats of Aladin icons are available here.
More information and references
Where can I find the manual?
A full Aladin manual is available in French and in English language on the Aladin official site.
In addition, online help for script commands
is available via the Help -> Help on script commands... menu, but also
on the Aladin website.
Additional support for the use of filters is also available separately.
How to acknowledge Aladin?
Is there an Aladin mailing list?
The Aladin mailing list is accessible here. It is mainly used for announcements from CDS to Aladin users. Do not hesitate to use it for general questions on the Aladin usage. Bug reports should be sent to the CDS hot line.
Are there Aladin video tutorials?
There are a few tutorials on youtube showing how to use Aladin. Some of them have been created by the CDS team, others by external users. Try youtube Aladin astronomy keywords in your favorite search engine to get them or have a look at the CDS Youtube channel.
What is this .aladin in my home directory?
The directory .aladin is used for four things:
-
Aladin uses a temporary directory to memorize full pixel images during a session. This directory caches are created inside the
.aladindirectory in your home directory which is never removed. -
The configuration file of the user preferences (
aladin.conf) is stored in this.aladindirectory. -
The Aladin compatible plugin Java classes have to be saved in a
Pluginssubfolder to be recognized by Aladin (see the Plugins FAQ question). -
The
Cachedirectory memorizing GLU record files, VizieR keyword files,... for starting Aladin faster, and also a lot of pre-loaded HiPS tiles for avoiding too many network accesses.
What is SAMP?
SAMP is a protocol for communication between client-side astronomy applications. Concretely, it allows you to send data to another SAMP compatible application and select some of them and see the corresponding selection into the other application.
SAMP is a three parts mechanism : two applications (or possibly more) and one "hub" for forwarding messages and data from one application to the other. Several SAMP hub implementations exist.
More information on SAMP web page.
Aladin is compatible with SAMP and integrates itself a SAMP hub. See the FAQ question "How to use SAMP?" for details.
What is the XML/VOTable format?
The VOTable format, developed by a consortium of astronomical institutes, is used to describe astronomical catalogues and query results with XML. Aladin uses it to retrieve data from VizieR, Simbad, NED, ... or to load local data files.
This format is detailed in an IVOA standard document.
What is the AJ format?
The Aladin format (AJ format) is used by Aladin to backup the
current work in a file, to be reused in a subsequent work session. This
is a proprietary format. It is not documented. The filename extension
required for it is logically .aj.
What is TAP? What is ADQL?
TAP is an acronym for Table Access Protocol. It is a very powerful mechanism for querying remote databases handling table data. Any type of constraint can be submitted and the resulting fields can be defined explicitly. TAP also incorporates an asynchronous request mechanism for large requests. TAP uses a dedicated query language called ADQL which is an astronomical extension of the well known DB query language SQL.
TAP and ADQL have been standardized by the IVOA in 2010.
What is a Datalink?
When you retrieve tabular data, you may have web links associated with the values in some cells. The method used to make this link is based on an IVOA protocol: Datalink. This method allows you to associate one or more links, to generate forms to fill in the missing elements of the link, etc...
DataLink has been standardized by the IVOA in 2010.
What is VizieR associated data?
VizieR provides a very large number of astronomical tables and catalogues. For some of them, associated data such as images, spectra and time series are also provided. Version 12 of Aladin allows direct access to them.
Timeline of Aladin Desktop releases
-
Aladin v12.0 Release of Aladin v12.06 on May 2023.
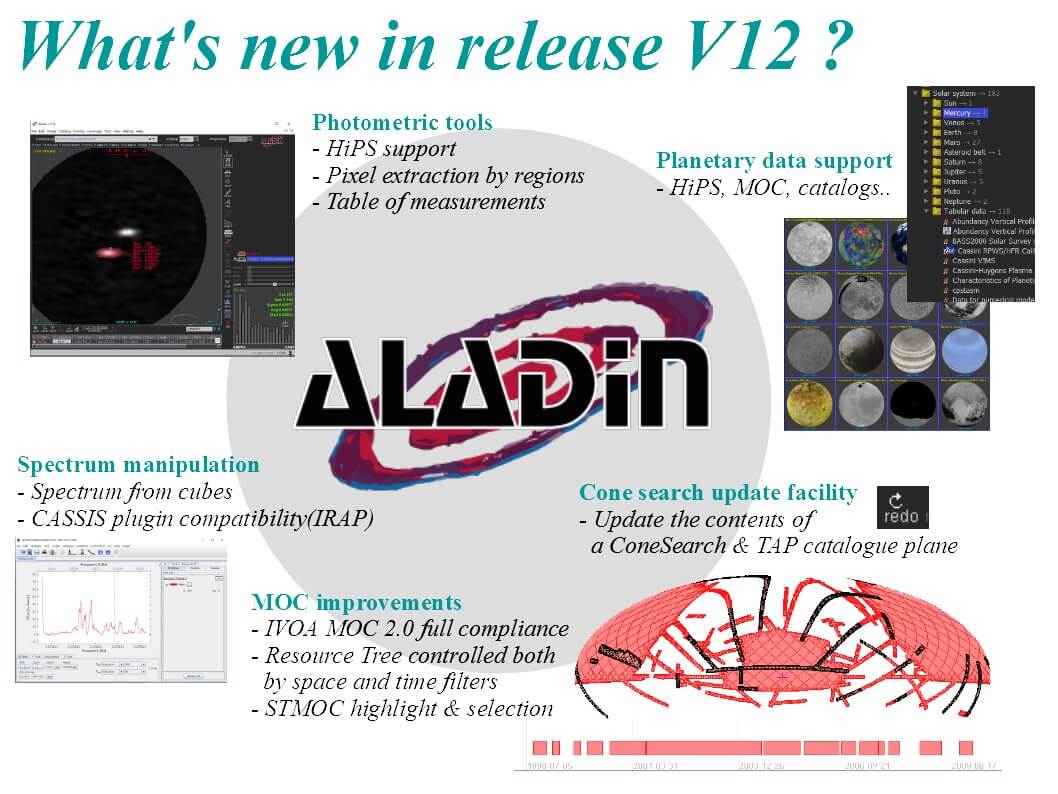
- Planetary data support : HiPS, MOCs, catalogues, ... (more...).
- Cone search update facility (more...)
- Photometric tool and pixel extraction improvements (more...)
- CASSIS VOTool/plugin integration (by IRAP) (more...)
- VizieR "associated data" direct access (more...)
- High DPI screen support (more...)
- MOC improvements:
- IVOA MOC 2.0 full compliance (STMOC, TMOC)
- MocServer v2 deployment allowing resource Tree controlled both by space and time filters
- STMOC highlight & selection
- Support for planetary MOCs
- Splitting MOC facility
- HiPS improvements:
- Faster thanks to gzip/nogzip automatic strategy for FITS tiles
- Better display in any projection (notably ARC, CAR)
- Hipsgen new coadd mode: SUM, DIV, MUL
- Cut estimation by regions (pixelCut=byRegion)
- In line documentation
- SExtractor service improvement: full local image support (more...)
- VOObserver interface extension (more...)
- New supported projections: Mercator, HEALPix
- Fits improvement: PanSTARRs BOFFSET/BSOFTEN special coding supported (more...)
-
Aladin v11 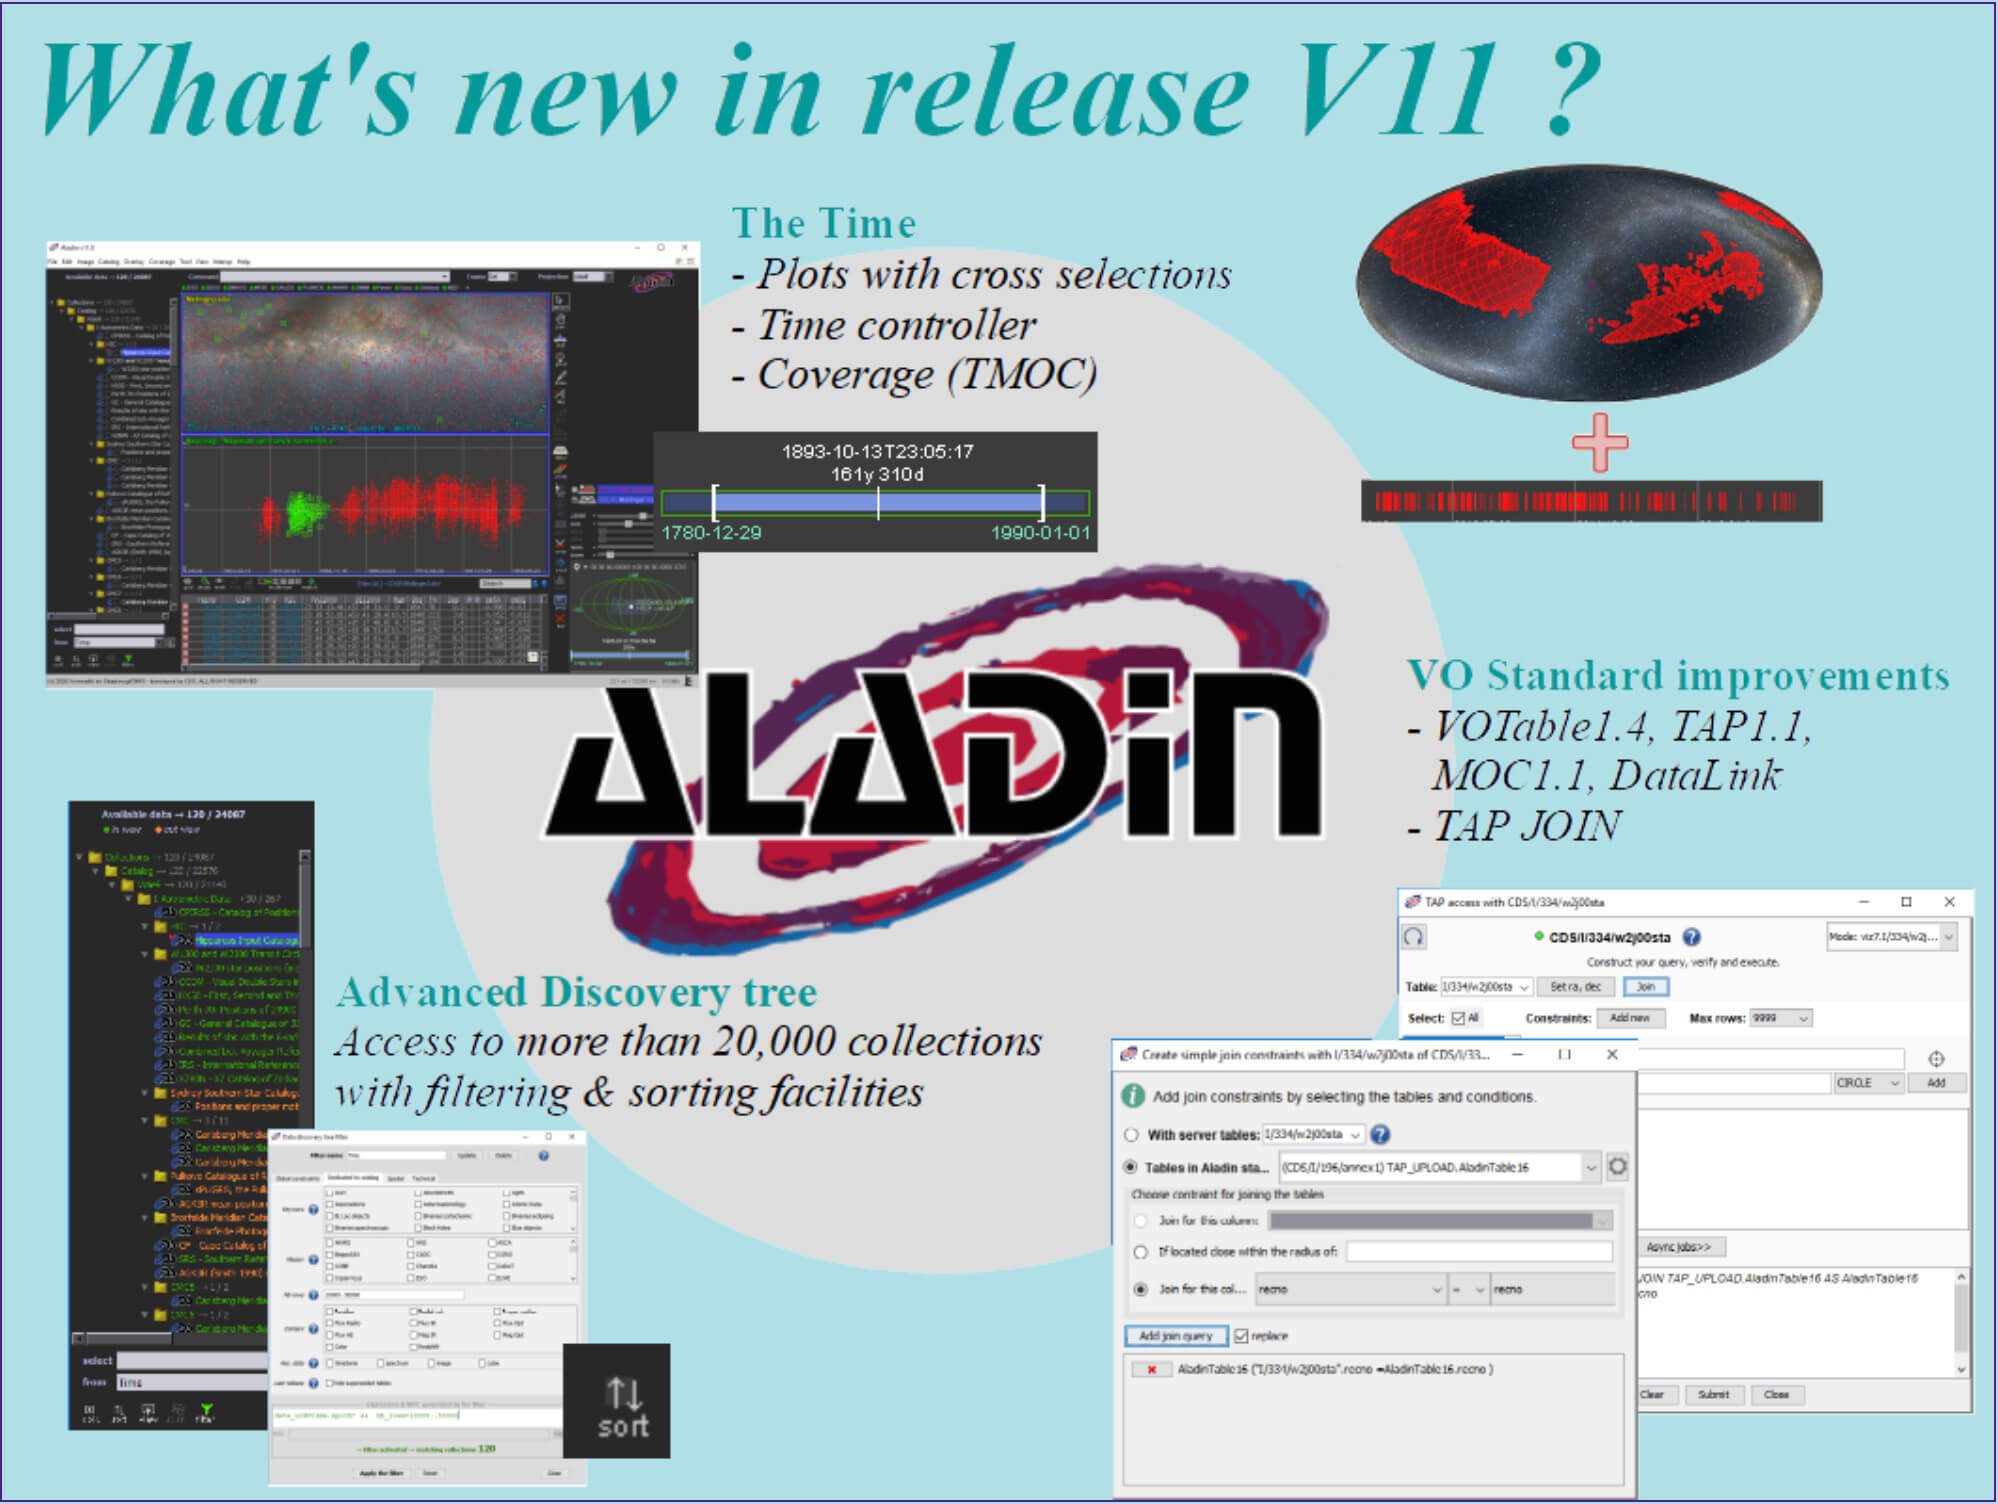
-
Temporal support (more...):
- Time controller
- Time plots
- Time coverages (TMOC and STMOC)
-
Compliance to new IVOA standard:
- TAP1.1 support (
s_regiondefinition) - MOC1.1 support (ASCII format)
- VOTable1.4 support (TIMESYS)
- TAP1.1 support (
-
TAP: support for JOIN and UPLOAD functions
-
Data discovery tree: sort and hierarchy control
-
Compliance with FITS standard 4.0 (image internal compression)
-
New CDS HEALPix library:
- Polygonal photometry tool for HiPS
- Query by any kind of regions
-
-
Aladin v10 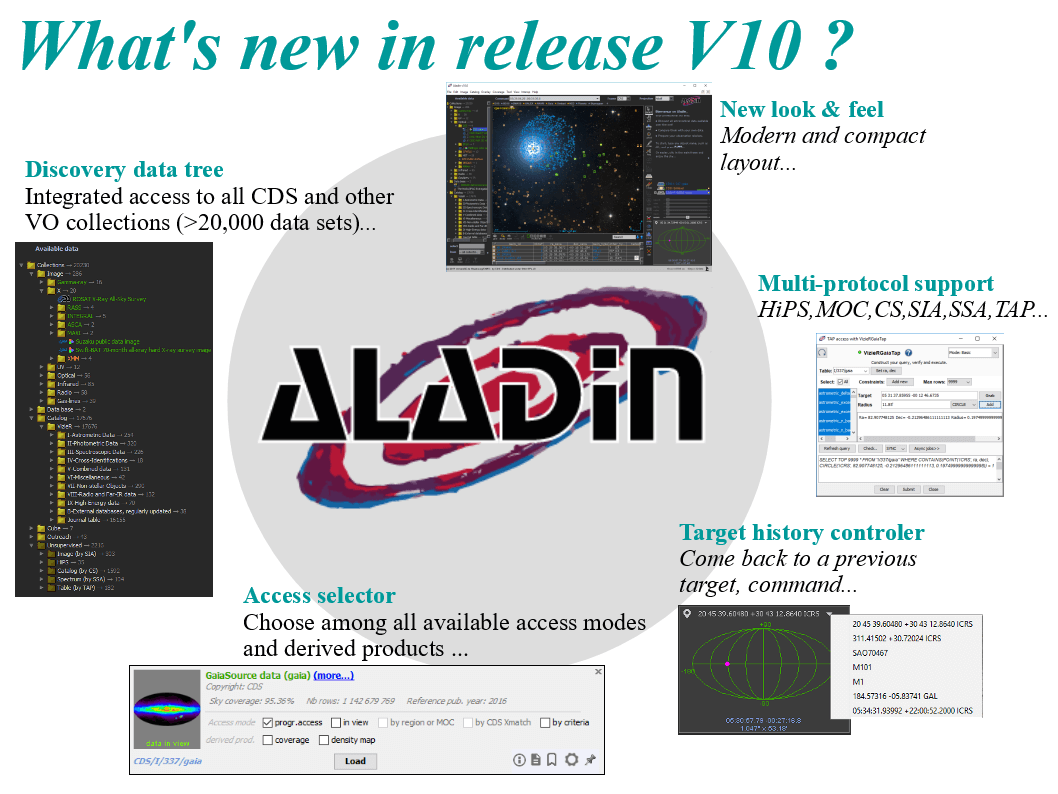
- Data discovery tree::
- Integrated access to all CDS and other datacenters and archives VO collections (>20,000 data sets)(more...)
- Fast data set filtering (by criteria and/or regions)
- Query enhancement:
- by criteria (TAP integration)
- by regions (MOC based)
- by X-match (thanks to remote CDS X-match)
- User interface:
- new theme,
- splittable frames, menu for full screen mode
- Derived products: access to coverages, density maps, progenitors...
- Multi protocol support & integration: HiPS, CS, SIA, SSA, TAP, MOC, Datalink, SODA, remote X-match, MOCserver,...
- HiPS improvements: mirror sites management, properties file direct support
- Deprecated supports: applet, outreach mode, PLASTIC protocol
- Data discovery tree::
-
Aladin v9 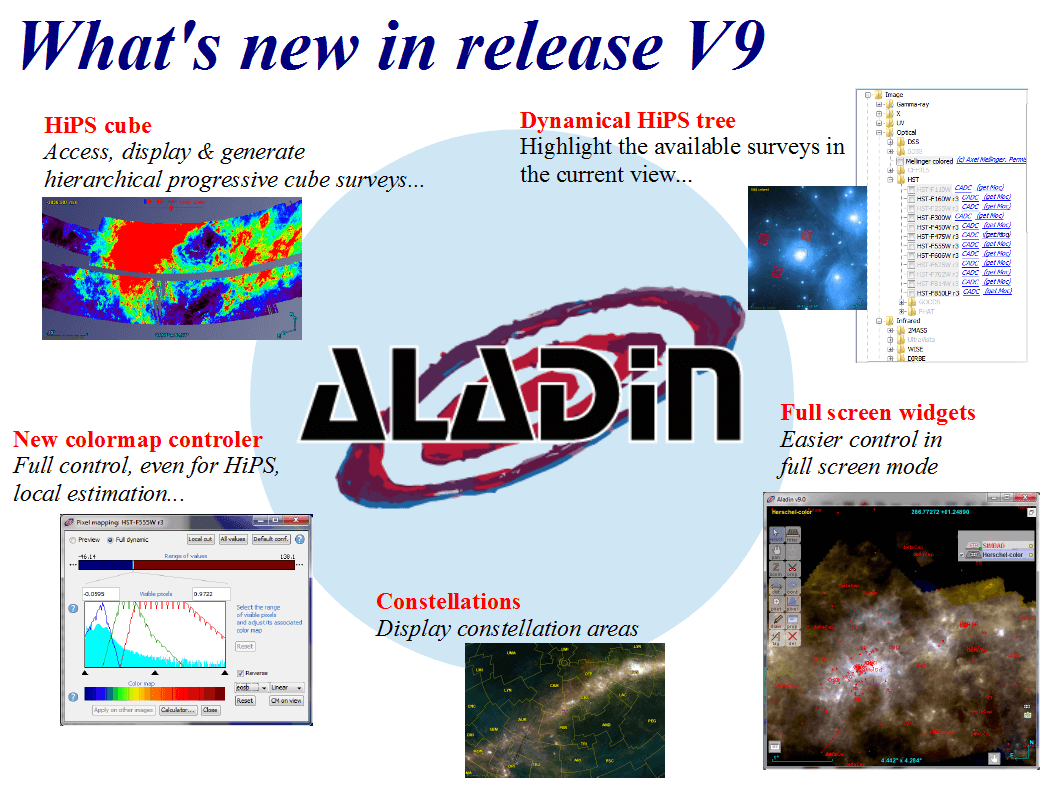
- HiPS improvements (more...):
- Faster display (no more GC "stop all" effect)
- Dynamical HiPS tree (highlights available surveys in current view)
- Cube support
- Colormap control for colored HiPS
- HTTPS support
- Hipsgen improvements: fully multi-thread, Obscore revamp, MIRROR and RGB actions, ADD mode, index.html, new parameters: tileOrder, maxRatio,shape & polygon, HEALPix FITS map support (any NSIDE, NESTED or RING)
- Colormap: new controller (localcut)
- Fullscreen widgets: Easier fullscreen control
- Projections: new projections: SCAMP PV, TPV, SINSIP
- Constellations: constellation area display
- MOC improvements: full MOC adaptative drawing,
draw MOCscript command - PDS: improvement of Planetary Data System image support (LSB,PREFIX,SUFFIX...)
- IVOA support improvements: ObsTAP & SIAv2 result support
- HiPS improvements (more...):
-
Aladin v8 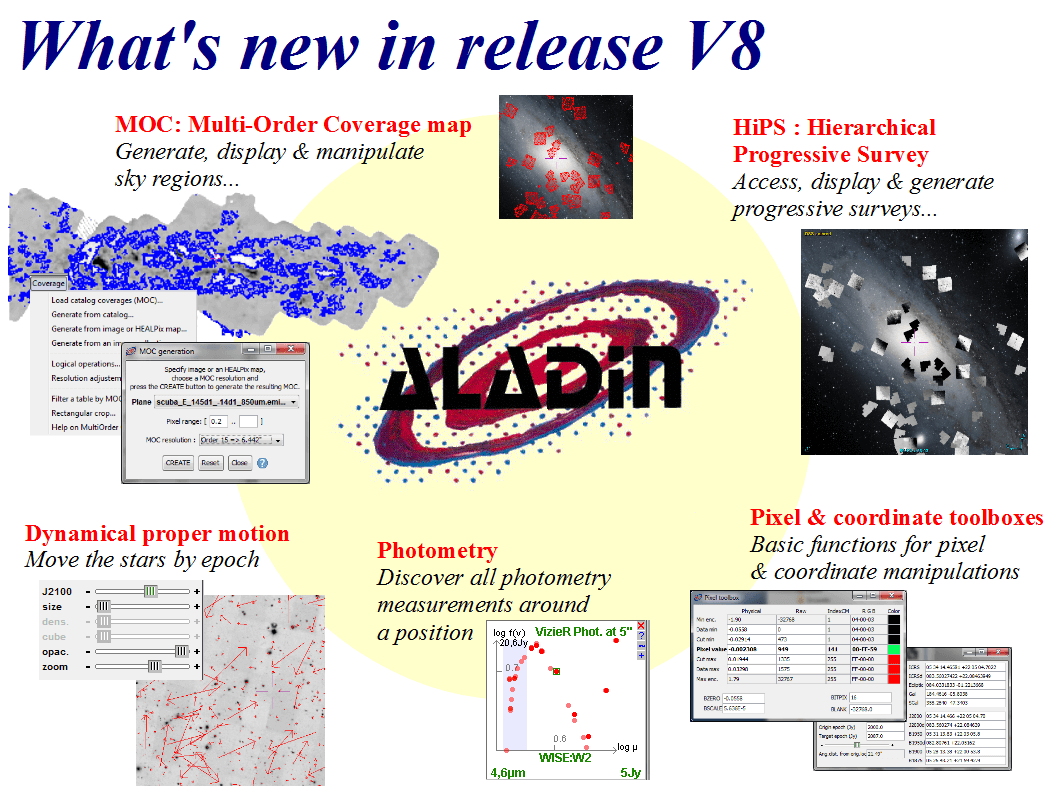
- Progressive Survey (HiPS) improvements (more...):
- Faster display,
- Faster generation (x5),
- Access to the original images and associated metadata,
- Original JPEG or PNG image support,
- PNG tiles,
- Progressive zoom,
- Mirrored servers auto-switching,
- Batch mode support (-hipsgen option)
- Coverage map (MOC) improvements (more...):
- Catalog & pixel survey MOC access,
- MOC generator from local images or catalogs,
- Logical operations,
- Filtering by MOC,
- Faster display (via adaptative resolution),
- IVOA MOC 1.0 standard support
- Batch mode support (-mocgen option)
- Proper motion: dynamic display (epoch slider) (more...)
- VizieR photometry tool: phot.graph on current position (more...)
- IVOA VOTable 1.3 standard support (BINARY2 + LINK + Note STC in VOTable 1.2 & 2.0)
- Miscellaneous:
- ASCII catalogs in GLON/GLAT, ELON/ELAT or SLON/SLAT
- JPEG large image: required RAM divided by 2
- Progressive Survey (HiPS) improvements (more...):
-
Aladin v7.5 - HEALPix all-sky new features:
- JSAMP Web profile support
- DS9 region definition support (as simple Aladin script commands) (more...)
- PDS image support (more...)
- Colored FITS cubes support (more...)
- HTTPS connection support
- ALMA footprint utility (
Server selector -> FOV) - TSV,CSV improvements (notably CSV Excel and IPAC-TBL support)
- Pixel extraction tool as table (more...)
- Bitpix image re-encoding tool (more...)
- Overlay color map tool (more...)
- Free rotation in allsky mode (more...)
- New coordinate frames: B1900, B1875, XY image
- New projections (Mollweide, SIP-TAN)
- Properties of graphical overlays (
propbutton) - Footprint STS-S definition support
- Print improvements (automatic scale, multiviews...)
macroscript command to launch a macro from a script- VOTable 1.2 STC coordinate reference support ("Referencing STC in VOTable" - IVOA Note 2010-06-18)
-
Aladin v7 (All sky) 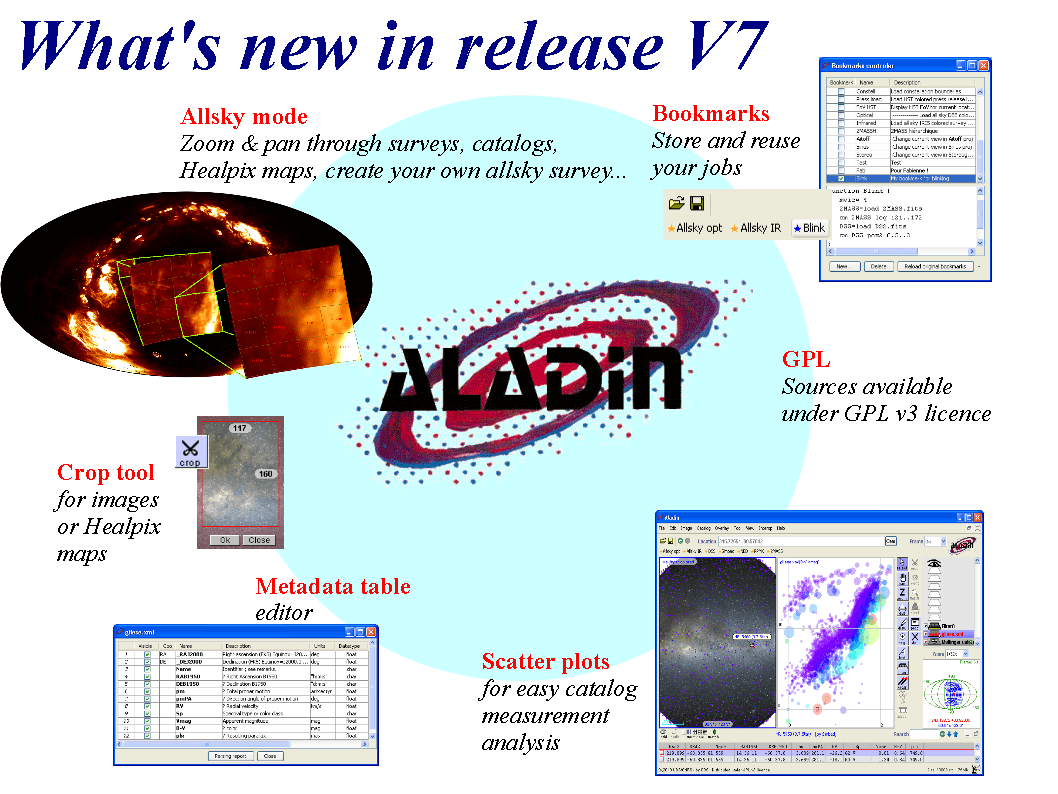
- All sky mode: Zoom and pan through surveys, catalogs, HEALPix maps (more...)
- HEALPix: Support for HEALPix FITS maps, multifield, polarisation...
- GPL: Distributed under GPL V3 license (sources available)
- Bookmarks: Store and reuse your usual jobs
- Crop: Crop tool for images or HEALPix maps
- Phot: Phot tool for local source extractions
- Tag: Label tag tool for annotating views
- Scatter plots: For easy catalog measurement analysis
- Tables: Splitting, merging, metadata edition...
- FITS 64 bits: Support for FITS 64 bits integer images...
- VOTable 1.2: Support for VOTable 1.2 including coordinate system frame support
- Calibrated PNG: AVM and FITS keywords support in PNG images for reading and writing astrometric calibrated colored images
- Colormap: Simultaneous adjustment of several images
- Console: New console managing history
- Script: Auto-synchronization, zoom angular parameter (zoom 10arcmin), overlay control (setconf overlay=NE,label...), convolution kernel (kernel=gauss(fwhm=10arcmin))
- Translation: Spanish (Spanish VO), Japanese (M. Ohishi)
-
Aladin v6 
- Undergraduate mode: Aladin simplified interface for undergraduate purposes (more...)
- Calibrated JPEG: AVM and FITS keywords support in JPEG images for reading and writing astrometrically calibrated colored images
- Dynamical histogram: Interactive histogram for browsing current measurements (more...)
- Full screen: Full screen support and preview window support
- RGB and pixel computations: supported for non-calibrated images
- Undo position list:for going back to the previous locations
- Simbad fast access: fast Simbad access allowing very large queries
- VizieR whole catalog: new checkbox in the VizieR forms for downloading whole catalogs
- Photometry tools: tools for simple photometry measurements (by circles or polygons) (more...)
- SAMP compatibility: Support for the new PLASTIC standard called SAMP allowing interoperability between several VO applications (more...)
- FITS Rice: Support for FITS RICE compression
getscript:getscript improvements allowing not positional parameters and SIA/SSA filtering (more...)- FoV rotation: FOV rotation center control (more...)
- Translation: Italian (G. Iafrate), German (F. Freistetter), Persian (A. Sedaghatkish)
-
Aladin v5 
- Swing Look&Feel: Swing GUI instead of AWT meaning a menu bar, more powerful tables, widgets, ...
- Huge images: No RAM limit -> ex: 64000x64000 pixels loaded in 35s (more...)
- Match scales and orientation: Automatic scale and orientation adjustment for easy comparison
- Image transparency: Image overlay support by transparency (more...)
- FoV: More FoVs (WIRCAM, ESPADON, full HST, INT, FORS1 & FORS2, ISAAC, VIMOS,...), remotely updated, displayable by transparency, user addition support (XML file)... (more...)
- Source measurements: more powerful table (tags, sort, column management, search...)
- Pixel control: Colormap controler improvements (faster, more colormaps...)
- Pixel computation: Image pixel computation support
(
+,-,*,/,norm,conv) (more...) - Script extension: Plane name used as a variable (ex: foo = ESO - STScI), set command extensions, ...
- Translation: Russian translation (N.Samus), traditional Chinese translation (Chi-Hung Yan)
- SSAP1.0: Support for SSAP 1.0 standard
-
Aladin v4 
- Big image support: ex: 20000x20000x64bits with a 1.5 Gbyte RAM machine
- FITS cube support: for displaying cubes
- EPS output support: for publishing
- Aladin plugins: extend Aladin by yourself (more...)
- PLASTIC integration: allowing interoperability between other PLASTIC compatible application (VOSpec, TOPCAT, VisIVO...) (more...)
- IDL library: for controlling Aladin from IDL (more...)
- Macros: useful for repeating a sequence of actions (more...)
- Ecliptic: Ecliptic coordinate frame support
- WCS keywords in JPEG: for JPEG astrometry solutions
- OS Drag & Drop: for easily importing data from the OS desktop into Aladin panels
- Mouse wheel support: for zooming (more...).
- Pan tool: for panning, especially in large images (more...)
- FITS XY linear support: for displaying not only the sky images (ex: solar images...)
- Clickable maps: for easily creating Web clickable maps (more...).
- CADC: Aladin offers access to the CADC (Canadian Astronomical Data Center)
- Chinese language: Chinese translation
-
Aladin v3.7 - Multi-language support: currently english and french (see
Edit -> User preferences...menu) - Xmatch support for ellipses: useful to take into account errors on position or cross-match some extended sources
- Image mosaic: as an alternative to the blink feature (
assocbutton) - Multiple FITS Extension support: images and/or FITS ASCII or binary tables
- Full VOTable support: inline base64 or href stream fits or binary
- Support for Character-Separated-Value catalogs: CSV -> Tab, pipe, semi-column, comma, one or several white spaces, S-Extractor output format) and not only Tab-Separated-Value catalogs (TSV) (See Edit -> User preferences` menu)
- status and set script command extension: shape, color, folder, view status
- Stack folder local scope property: to avoid catalog projection outside the folder
- FITS RGB images: RGB images saved and loaded as FITS cubes
- Miscellaneous: RGB image FlipFlop function - RGBdiff script
command - Information in
frame infocopy-and-pastable - Overlay tags use centroid algorithm - Stack width can be modified -allcolumnsparameter for theget VizieR()script command
- Multi-language support: currently english and french (see
-
Aladin v3.5 - User preferences: Allows users to memorize some parameters such as the default browser (Unix version), the default registry site...
- All VO button: Allows access simultaneously several data servers automatically discovered via the International Virtual Observatory registry.
- SkyBOT: Aladin offers access to solar system object ephemeris data base maintained by IMCCE (Paris).
- VOSpec: For spectral data, Aladin can launch VOSpec tool (ESAC/Vilspa development).
- Field of view improvements: Can now be rolled with the mouse and loaded via an XML file.
- VOApp interface: Aladin implements an extension of the ExtApp Java interface, called VOApp (managing images, FoVs and Tables).
- MAST: Aladin offers access to MAST images (STScI)
-
Aladin 3.0 (Multiview) - MultiView, multiProjection: splits the main Aladin frame in 2, 4, 9 or 16 panels in order to display simultaneously several images and catalogues overlays. Also, Aladin v3 offers zooming synchronization functions associated to this new multiview mode.
- Resampling: recomputes a pixel image according to another image astrometric calibration.
- Blinking: builds on the fly image sequences (slow movies)
- Full pixel access: full pixel manipulation and not only 8 bits
- GIF, JPEG and PNG support: compatibility with common image formats as input.
- Scaling functions: log, sqrt, linear, pow2 functions for better pixel contrasts
- Cut graph: along any segment
- Region Of Interest generator: automatically builds small views around interesting catalogue objects.
- Cross match algorithm: for better object catalogue analysis
- Catalogue column generator: allows you to compute new catalogue columns via algebraic expressions.
- Extended script commands and new console facility: to support new Aladin v3 functions
- Grid algorithm: improves grid drawing in any coordinate frame
- Demo trace mode: robot mode for "show you demonstrations"
- IRAS/IRIS: Aladin image server provides IRAS/IRIS images.
- SDSS: Aladin offers access to SDSS (Sloan Digital Sky Survey)
- Signed applet: Aladin is now a certified code. It means that the previous restricted functions (save, load, print...) are now allowed in applet mode.
- HTTP authentication: Aladin supports HTTP data authentication scheme (RFC 2617) for restricted access data.
-
Aladin 2.0 - Meta data representation: shows image data server results either in list representation or in tree representation, and provides more meta information on images (FoV, available codings...)
- IDHA and SIA compatibility: allows you to integrate in Aladin IDHA or SIA image servers.
- ExtApp interface: Aladin can interact with external Java applications such as VOplot (VO-India) by a simple Java interface (see below)
- Autocut enhancement: allows you to reload the original image pixels in order to re-cut the image dynamics.
- Filter popup menu: helps you to write a filter by providing current column names, UCDs syntax...
- Autoscan user directory: creates a meta data representation from a user directory.
- Manual catalogue reduction: allows you to calibrate a catalogue without coordinates.
-
Aladin 1.4 - Object filters: allows you to control object overlays (shape, colour, size) according to object measurements.
- Manual astrometric reduction: allows you to recalibrate the images astrometry.
- Plane stack: unlimited number of planes - hierarchical representation by folders.
- Popup menus: frame view popup menu and stack popup menu for a more flexible feature access.
- Megacam FoV: Field of view of the MEGACAM instrument on CFH telescope.
-
Aladin 1.3 - RGB images: allows you to create an RGB image. An RGB image is a composed colour image built from three images.
- Contours: allows you to draw isocontours out of a selected image.
- Links to original images: provides a HTML page with links to the original images loaded in Aladin applet or standalone.
- Splittable interface: Allows you to set the object information in an independent window .
- Flip/flop feature: Allows you to inverse pixel images (top/bottom or left/right) and their associated astrometric reduction
- Arrow key control: allows you to focus the colour mapping and the wen position not only with the mouse but also with the arrow keys.
- LEDA access: Aladin offers access to LEDA (Lyon-Meudon Extragalactic Database).
- FIRST and NVSS access: Aladin offers access to radio images from NRAO.
-
Aladin 1.2 -
2MASS access: Aladin image server can provide 2MASS images.
-
SkyView, SUPERCosmos, DSS mirrors sites: Aladin offers new access to data servers.
-
Script mode: Aladin can be controlled by command lines. This method can be a way both to work with Aladin STANDALONE in a batch mode or to pre-configure Aladin APPLET (see the script section).
-
The manual: in addition to this FAQ, a Aladin manual is available.
-
blinking sources: The current source (under the mouse) is blinking to help you see it more easily.
-
Low resolution: Aladin image server can provide DSS images in low resolution. So, three resolution are available: the PLATE view (about 5x5 degrees), the LOW resolution (about 1.5x1.5 degrees) and the FULL resolution (about 10x10 arcmin).
-
Field of View feature: It is possible to overlay the field of view of some major instruments (currently: CFH12K camera, XMM instruments and WFPC2-HST camera). Rotation of the field can be monitored from the 'Prop.' window.
-
Scale plane: on the top of the plane stack, you find a new kind of plane: the scale plane. This plane contains three additional things that you can display on the current view:
-
the scale: a small line gives the scale of the view;
-
the coordinate grid (for constant RA and DEC values);
-
the target: a large cross (+) indicates the object or position used as centre in the initial query.
-
-
shortcut commands: when you click in the rectangle indicating the current position (just below the menu), you can submit a "shortcut command" allowing you to query directly data servers. See the corresponding section.
-
Coordinate manipulations: to visualize the location of a specific object or position in the current view, you can simply click in the rectangle indicating the position and type the coordinates (or Simbad identifier). After pressing the 'RETURN' key, the current target (large +) will move at the corresponding position in the view. Also if you click on the view, the corresponding position will be automatically memorized in the position rectangle. Move the cursor in the position rectangle to retrieve this position and possibly cut-and-paste into another application.
-
Aladin wink: click on the eye at the top of the plane stack to switch on/off the overlay planes.
-
Click-and-drag in the measurement window: you can scroll up/down/left/right the contents of the measurement window (at the bottom of the Aladin Interface) just by clicking-and-dragging on it. It allows you to consult more easily long lines and long lists.
-
Additional servers: with the Standalone version, users can define their own servers (for images or data). See the corresponding section.
-